


So you've had your Mac for a while and things don't feel as fresh and clean as they used to. Here are the steps you can take to declutter your Mac, possibly get it running faster and make it feel like new again.
Upgrade your operating system
These instructions assume you have the latest Mac operating system, macOS Sierra. If you don't, we recommend upgrading. Otherwise, you won't be running the most efficient, secure version of the operating system, and our tutorial may not make sense. For most machines from 2009 and later, the upgrade is free.
OS updates often happen automatically, but you can double-check if you're unsure. View and install available OS updates through the Apple Menu (click the Apple icon on the top left corner of your display) then About This Mac > Overview > Software Update.
Restart your computer
Next, go ahead and restart your computer. Many minor glitches or performance issues can be cured with a simple restart. A fresh boot means you'll have the most accurate experience of how your Mac performs. From there, you might notice that the booting up process is sluggish. If so, that's the perfect place to start.
Manage startup items
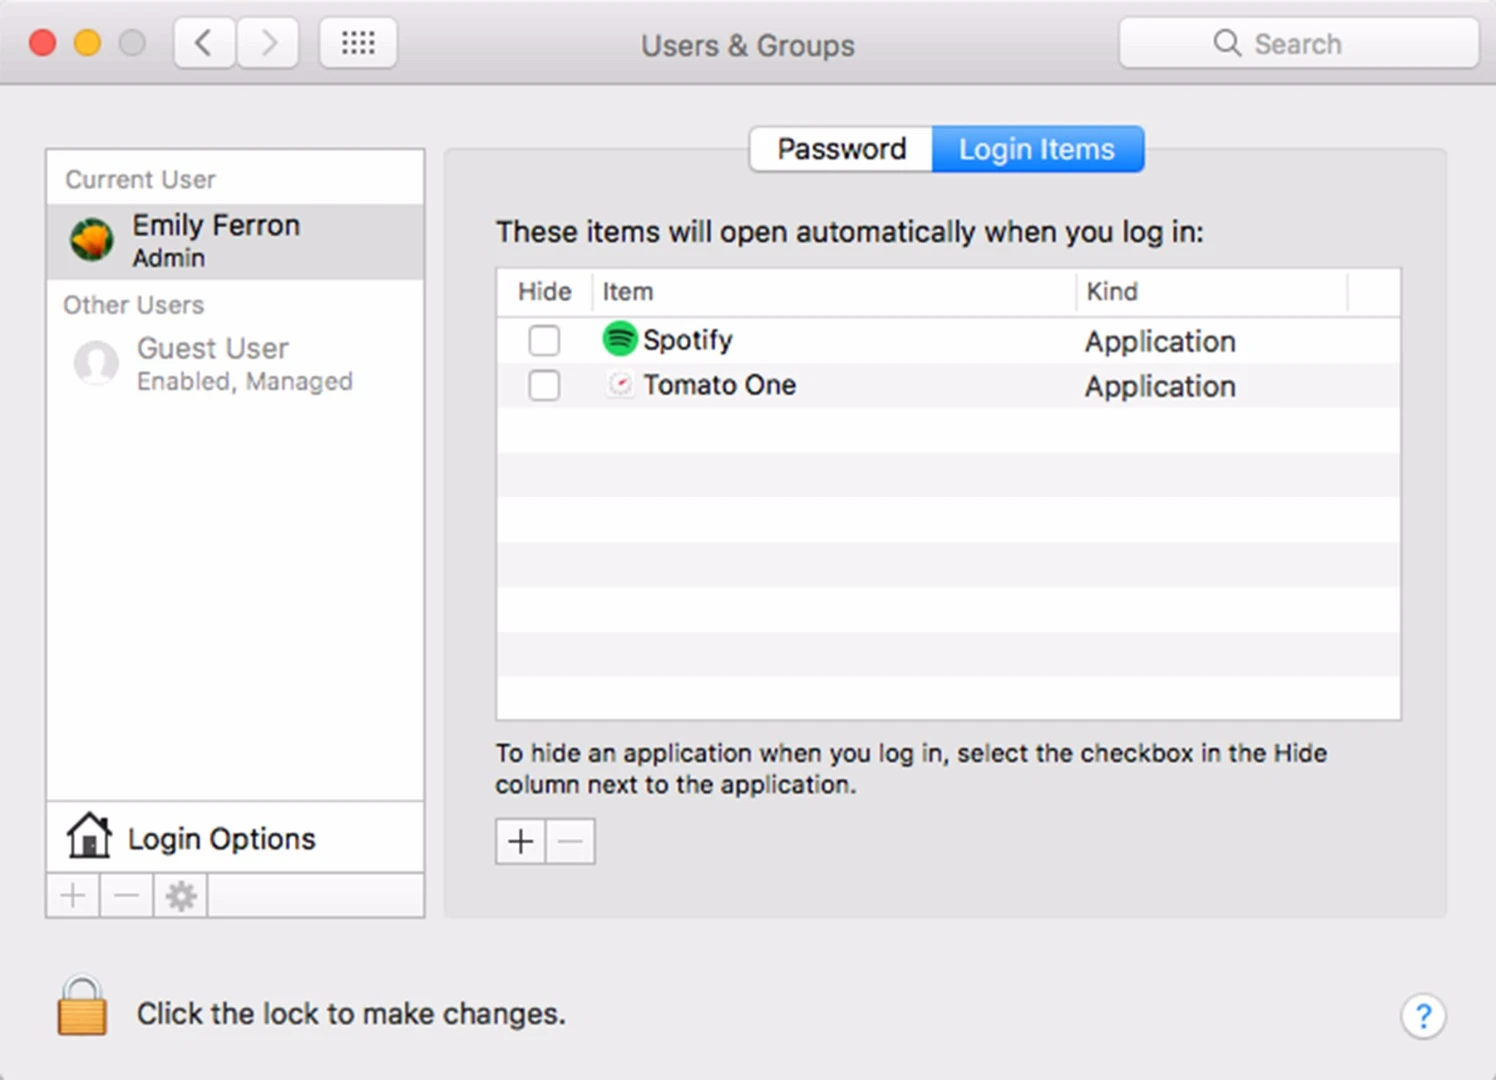
Slow startup might be the first thing you notice as your computer starts to age. It's often caused by apps that launch automatically when you turn the computer on. After years of using your computer, you may have inadvertently accumulated quite a few of these auto-starting apps.
It's easy to change or remove them. Under the Apple Menu, select System Preferences, then Users & Groups. Depending on how many users you have, you may need to repeat the following steps several times.

Click the "Login Items" tab. Once you're there, you'll see a list of items that open automatically once you log in. If you wish, you can simply hide these items, but that won't do much to boost your slow start-up speeds. Instead, select each item you want to remove, and then click the minus (-) sign at the bottom of the window. Eliminating unneeded items combats your sluggish starts.
Clear up hard drive space
In most cases, clearing hard drive space does not actually make your computer run faster. However, it's an essential part of Mac maintenance if your machine is approaching the limits of its internal storage. It's also a good idea from an organizational standpoint.
There's no point in sugarcoating it: Search-and-destroy is a chore. However, there are strategies and built-in OS tools that help streamline the process.
Start with apps
If you're doing things the manual way, removing unnecessary apps can be an efficient way to start clearing up hard drive space on your Mac. To view your apps, go to Finder > Applications.
Unlike Windows machines, Macs don't have a built-in "Uninstall" function that removes associated files along with core app files. When you're removing apps via the Finder, check through the app folders to see if there is an associated Uninstaller feature. If there is one, use it. Following the Uninstaller's instructions will probably remove the app as thoroughly as possible.
If there's no uninstaller, just click and drag the application to the Trash. Once you empty the Trash, the app becomes permanently deleted.
With the drag-to-trash method, there is a chance that some of the app's accessory files (cache or other data) may not be deleted. For the most part, these files are nothing to worry about – they are often small and hidden in a system folder you'll never notice. But they can add up, and since they serve no purpose, you may prefer eliminating them.
Different apps store data in different ways, so there is no one-size-fits all manual solution. Alternatively, App Cleaner (free to download; US$3.99 in-app purchase unlocks Pro version) is one handy third-party tool for removing apps and associated files.
Delete large files, duplicates, downloads and installers
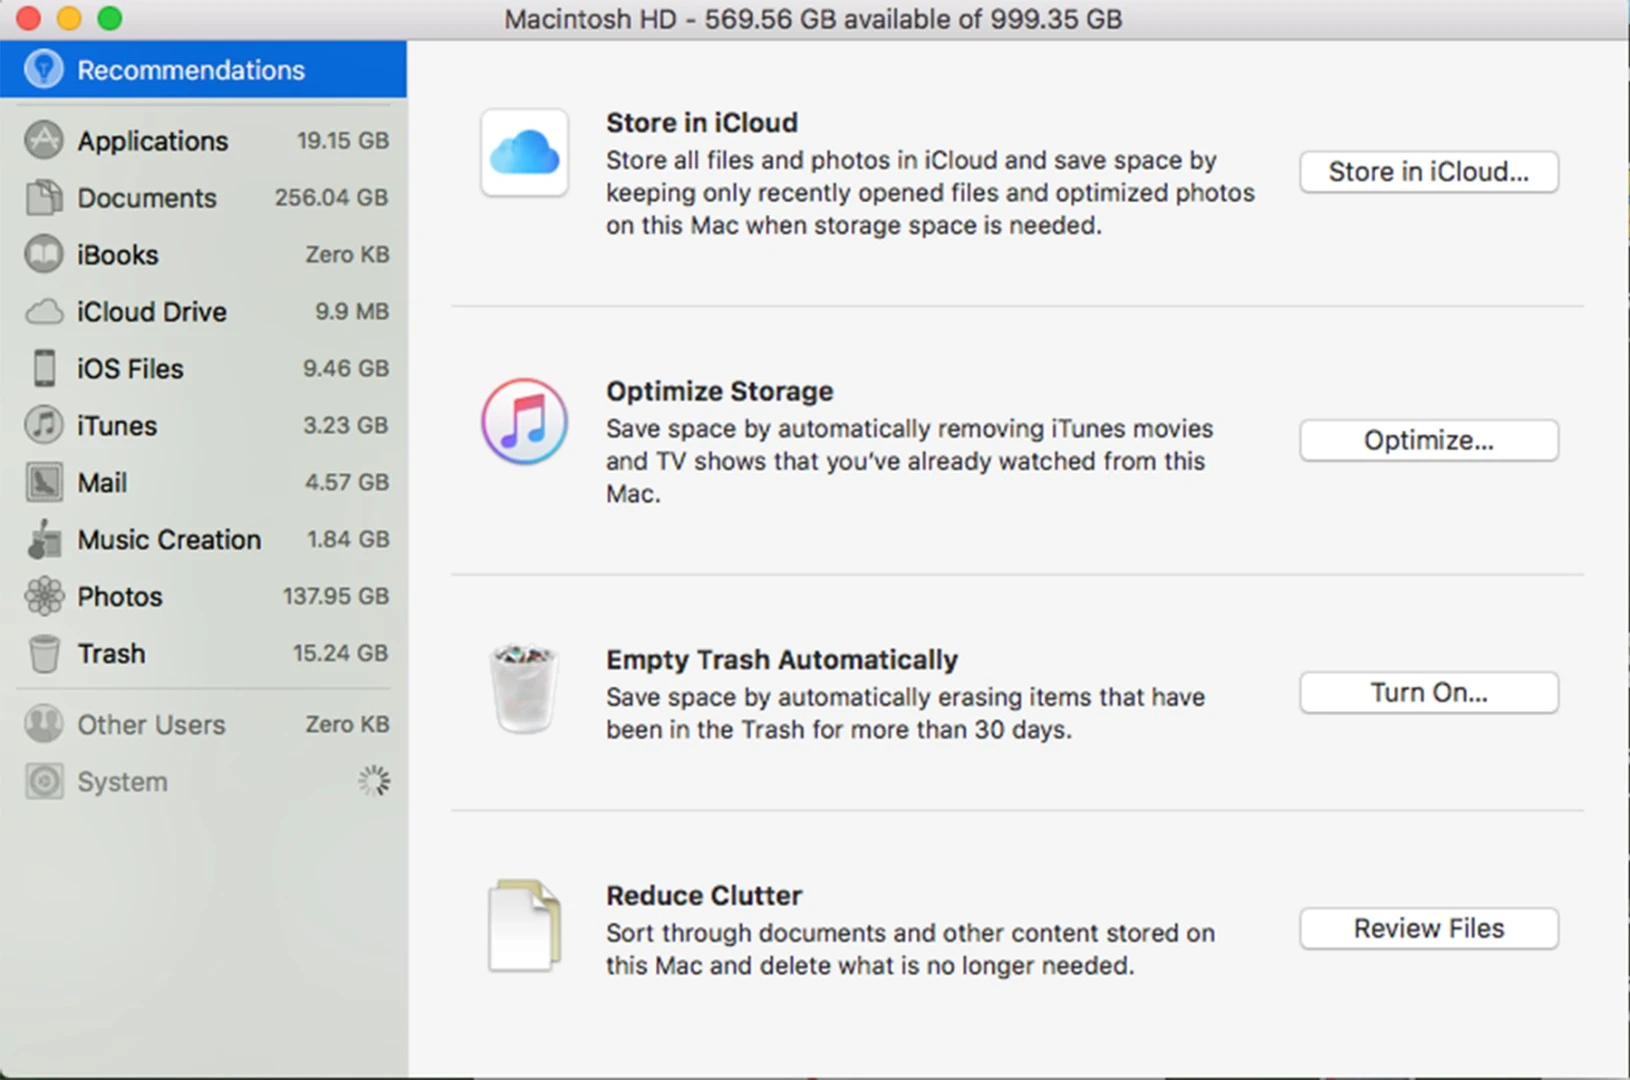
macOS Sierra has a built-in utility to help you identify files that needlessly bloat your computer. Under Apple Menu > About This Mac > Storage > Manage > Recommendations, macOS gives you a few suggestions for cleaning things up.

The first option is "Store in iCloud", but unless you have a rock-solid understanding of the way your iCloud works (or you've already made up your mind to purchase additional iCloud storage space) we suggest avoiding this option. It frees up space on your local device, but you only get up to 5 GB of free storage in the iCloud. It's very easy to fill it up with photos, music and more, especially if you have more than one Apple device. (Apple would just love for you to purchase more, but there are other options that won't cost you.)
The next option, "Optimize Storage", deals with iTunes video content. If you're a one-and-done movie/TV show watcher, this option could save you time by not having to delete already-watched content manually.
There's also an "Empty Trash Automatically" setting, which removes items from the Trash (read: permanently deletes them) once they hit the 30-day mark. This mild convenience is up to user preference: I prefer to give my files a personal once-over before I bid them a permanent farewell.
Lastly, you'll see the "Reduce Clutter" option with a "Review Files" button. When you review files, you'll see a file browser that looks a lot like the Finder, but with a more helpful view for purging purposes. It searches and displays relevant files from all your folders, not just one folder at a time.
There are tabs for Large Files, Downloads, and a File Browser, so you can jump right to the relevant category. Deleting unnecessary large files is an efficient way to make space, and the Downloads folder is a common catch-all for irrelevant files like installers and temporary items. Move any documents you want to keep, then empty the folder.
Duplicate files are a common issue. Unfortunately, there aren't too many free alternatives to the old-fashioned way: Keeping your eyes peeled as you weed them out one by one. You can consider trying a third-party app like Duplicate Detective ($4.99) which claims to automate the process.
iTunes, iMovie and Final Cut have their own trash cans
These space-demanding apps have their own in-app content and trash cans. If you're doing a major cleanup, don't forget to address these content libraries.
iTunes does have a handy duplicate detection feature: Open iTunes, then click the "Songs" tab in the library. In the top menu, go to File > Library > Show Duplicate items.
Empty the trash
Don't forget that your files and folders are not truly deleted – and won't free up any space – until you empty the Trash. After you go on a deleting spree, open the Trash and either click "Empty" to purge everything, or control + click individual items and choose "Delete immediately" to eliminate them one at a time.
External storage
If you're maxing out your internal storage, a few bouts of focused deletion only go so far. Move your files to the cloud or an external storage device, or you'll keep facing the same problem. Old work or school projects and photo collections are prime candidates for off-device storage.
Maintenance with Disk Utility
If you're used to Windows machines and their built-in defragmentation tools, don't fret that they're missing from your Mac. Macs and PCs store files differently, and defragmentation is generally a non-issue in the Apple ecosystem.
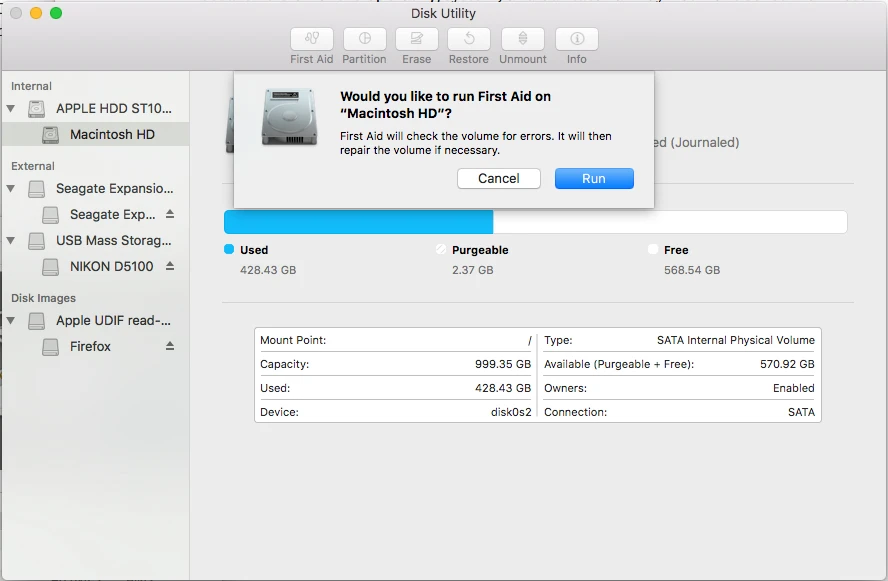
However, you can do a few clicks' worth of maintenance using Disk Utility (Applications > Utilities > Disk Utility). Specifically, you can run the First Aid feature, which can repair certain disk problems. Generally, if there's something wrong with a disk, you'll know it: Corrupt files, the computer won't start, apps quit unexpectedly, or external devices don't work. But it's a quick and harmless practice to check on your drives as part of routine maintenance.
Open Disk Utility, and select the drive you'd like to check (the one that includes your operating system is usually called Macintosh HD). Then click the "First Aid" button at the top of the window. Follow the prompts to run a scan and repair any found issues.
Adding more RAM
Unlike hard disk maintenance, adding RAM (memory) to your machine can make striking, immediate improvements in your computer's performance. That's because RAM handles all of your device's active functions. Photoshopping a DSLR pic with 15 browser tabs open and Spotify playing in the background? You're giving RAM a real workout.
In general, more RAM is better. Instructions for adding RAM depend on the model of your machine (assuming you have a model where it's possible – none of Apple's recent MacBooks support upgrading RAM), but you may be pleasantly surprised at their simplicity. On a newer iMac, for instance, swapping out RAM is comparable to opening a trap door and plugging in a couple of disks.
Checking your current RAM
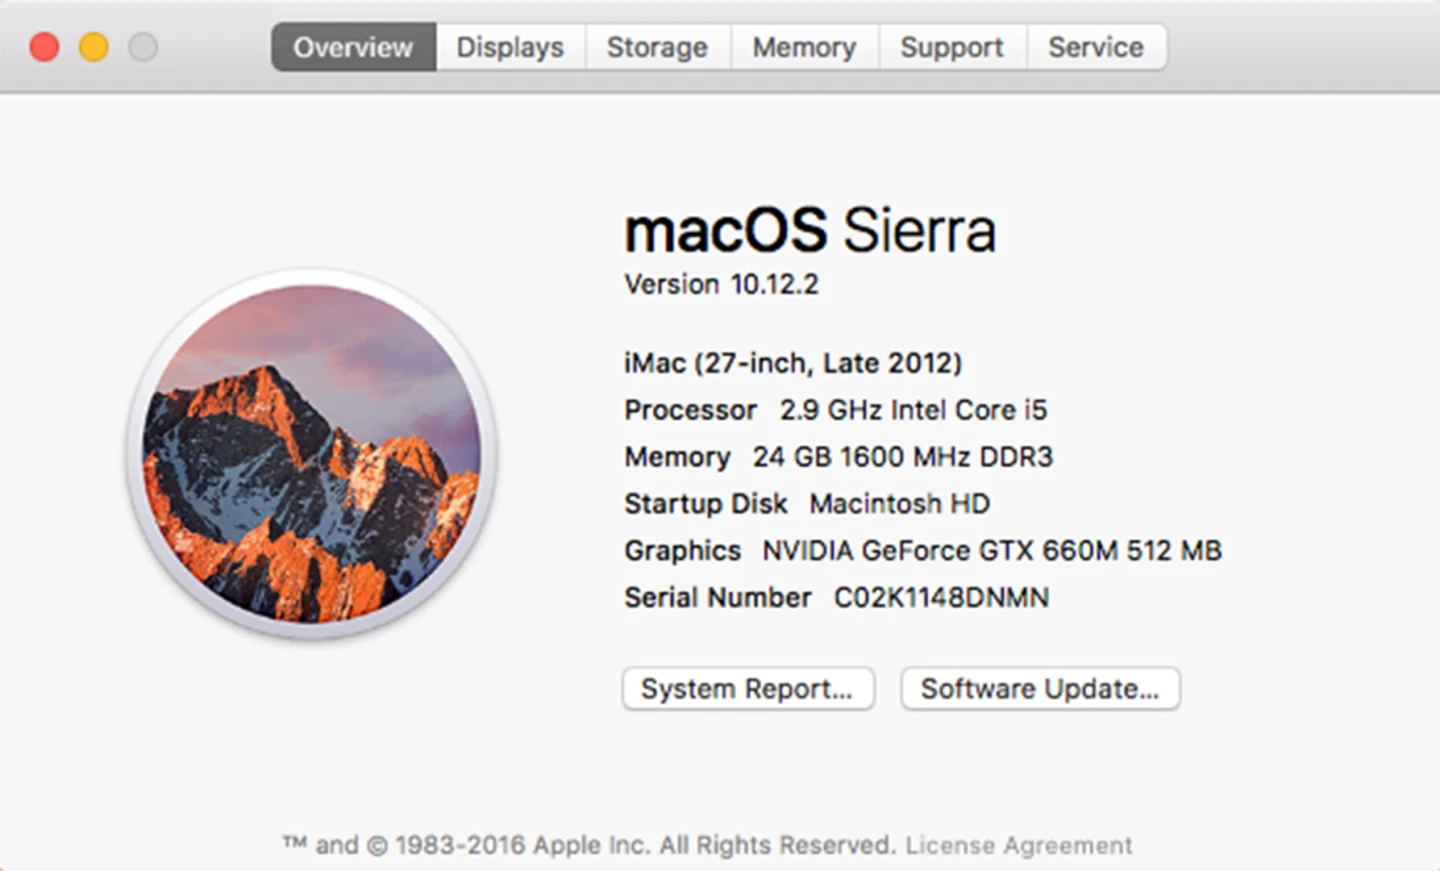
If you're considering this, the first step is to check the amount of RAM in your computer and see if it's capable of holding more. Go to Apple Menu > About This Mac > Memory. This window tells you how much RAM you have, and how much your machine is capable of holding.
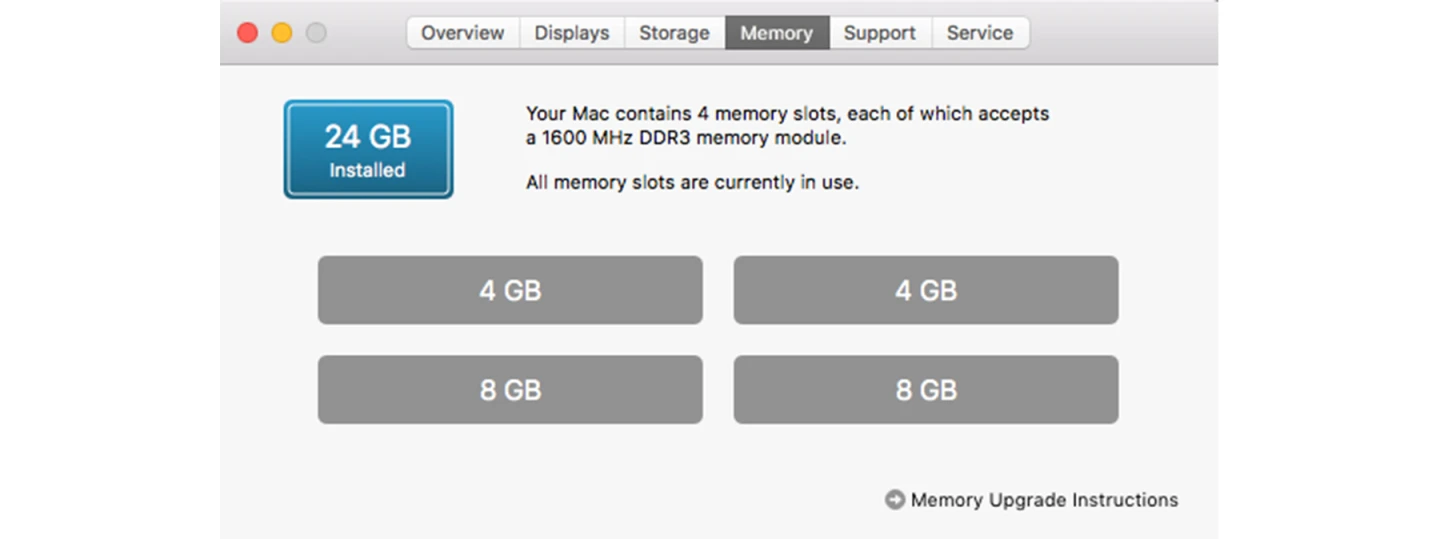
In the case of my iMac, I have 24 GB of RAM installed. By clicking "Memory Upgrade Instructions" I confirmed that 32 GB is the maximum amount my iMac will hold. If I were so inclined, I could swap out the two 4 GB memory modules in favor of two 8 GB ones.
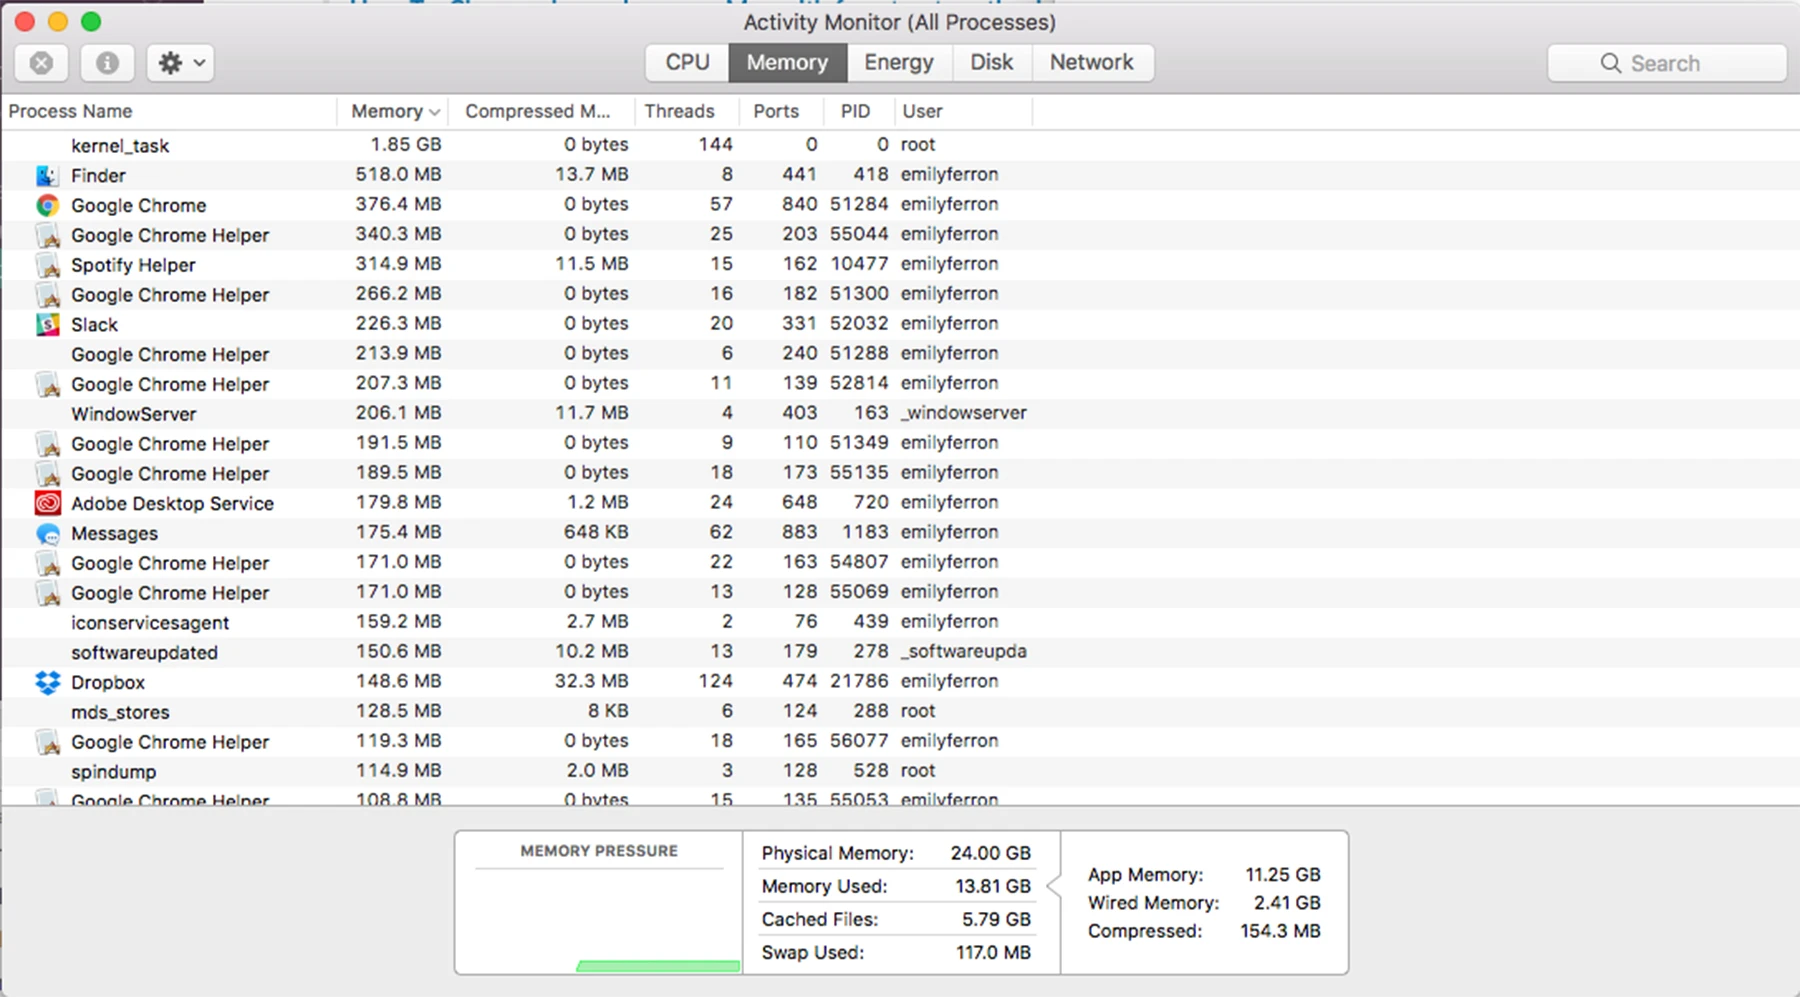
Viewing the Activity Monitor
The Activity Monitor is a built-in utility that displays how much of your Mac's resources are in use at the present moment. Access it under Applications > Utilities > Activity Monitor. Once it's open, click the Memory tab at the top to assess your RAM needs.
Don't be intimidated by the confusing list of file processes. Your main concern is the box at the bottom of the window which gives a "Memory Pressure" visual and lists how much of your memory is in use at the present. High Memory Pressure is an indication you'd benefit from more RAM.
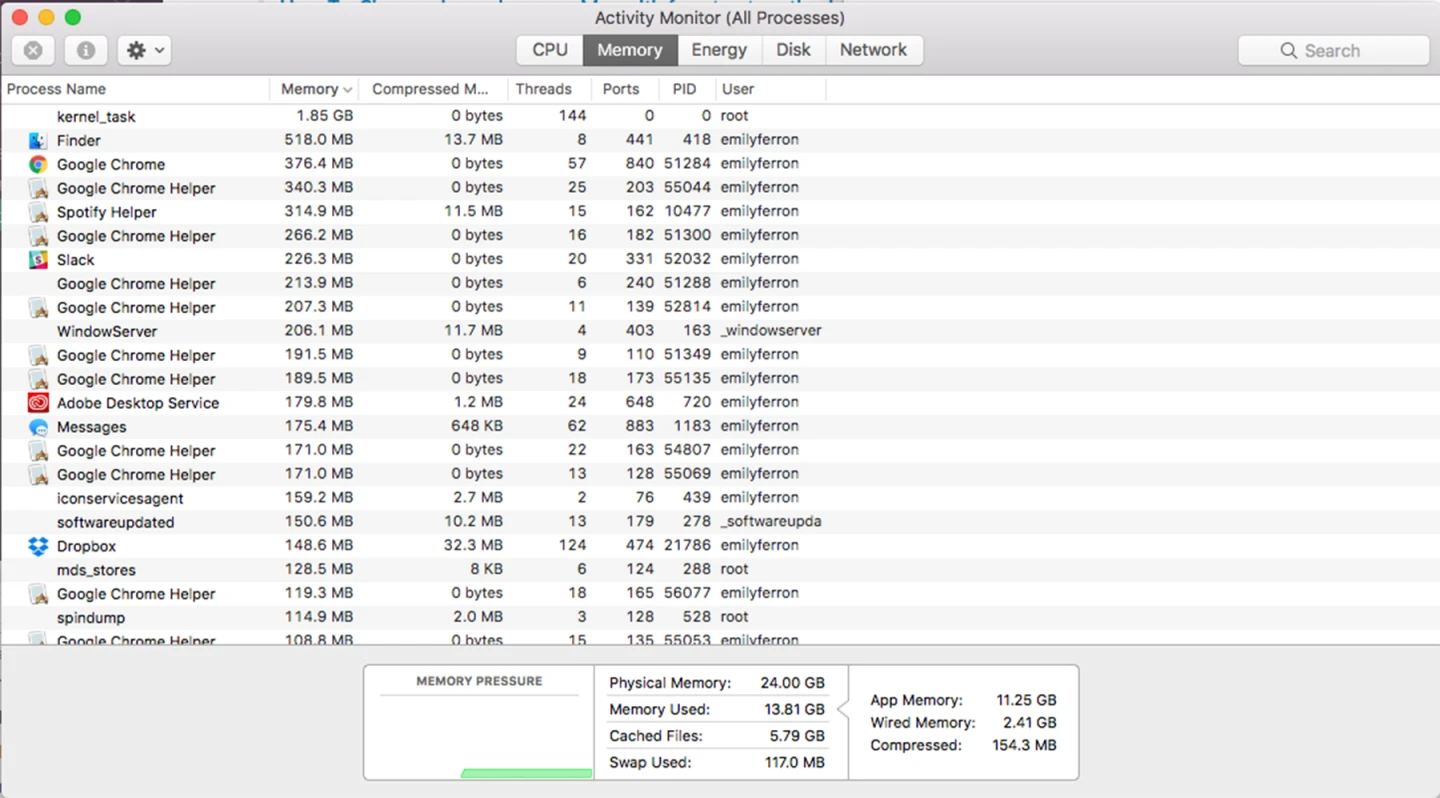
To most accurately assess your needs, view the Activity Monitor during your typical workflow. If you're a graphic designer, for example, check the Memory Pressure while you're using heavy-duty apps like the Adobe Suite. A real-time look at RAM usage while you're just surfing the web won't tell you enough about your more demanding needs.
If you decide to add more RAM, check Apple Support for your current model. (Confirm your computer's details under Apple Menu > About This Mac.) You'll find specifications for purchasing RAM, instructions for adding it yourself, and model-specific precautions.
Polish it off
Why not wind up your cleaning and maintenance efforts by organizing your desktop and cleaning up the outside?
A cluttered desktop on your computer is just like a cluttered desktop in real life: It counteracts productivity by distracting you, obscuring important info, and feeling generally un-zen-like. Deleting old screenshots and working files from your desktop probably won't make a dramatic difference on your hard drive, but it will feel a lot better.
As far as cleaning the external parts of the machine, you don't need to do it, but the attention to detail enhances the overall package. (After all, you didn't likely choose an Apple PC just because of its inner beauty.) It also helps keep your hardware in good condition.
When you clean a Mac, unplug it and allow it to cool off first. Never spray anything directly on it (especially the display) and make sure to keep moisture away from all openings. A wipe down with a soft, clean, lint-free cloth (like the chamois cloth that arrives in the box) is effective for removing dust and debris from the display. For more stubborn spots, or for cleaning more rugged areas of the build, lightly dampen the cloth with water.
For more productivity and maintenance tips, check out these articles from New Atlas:


