


After a couple of successful Kickstarters for versions of its book-sized smart telescope, DwarfLab opted to jump straight into production for the Dwarf III. We've recently been out stargazing and wildlife watching with this latest dual-lens budget-friendly sky watcher.
The basic idea here is to set it up on a tripod or flat on the ground, connect to an app, select a target and the Dwarf III will do the rest. Then you can relax while viewing the results on your smartphone screen, before downloading to a computer to edit if needed and share. Simples.
In some respects, this general outline rings true during use. But as a complete astrophotography novice, I found some of the things needed to get a decent end result to be quite involved, and even challenging. Let me explain myself.
Getting to know you
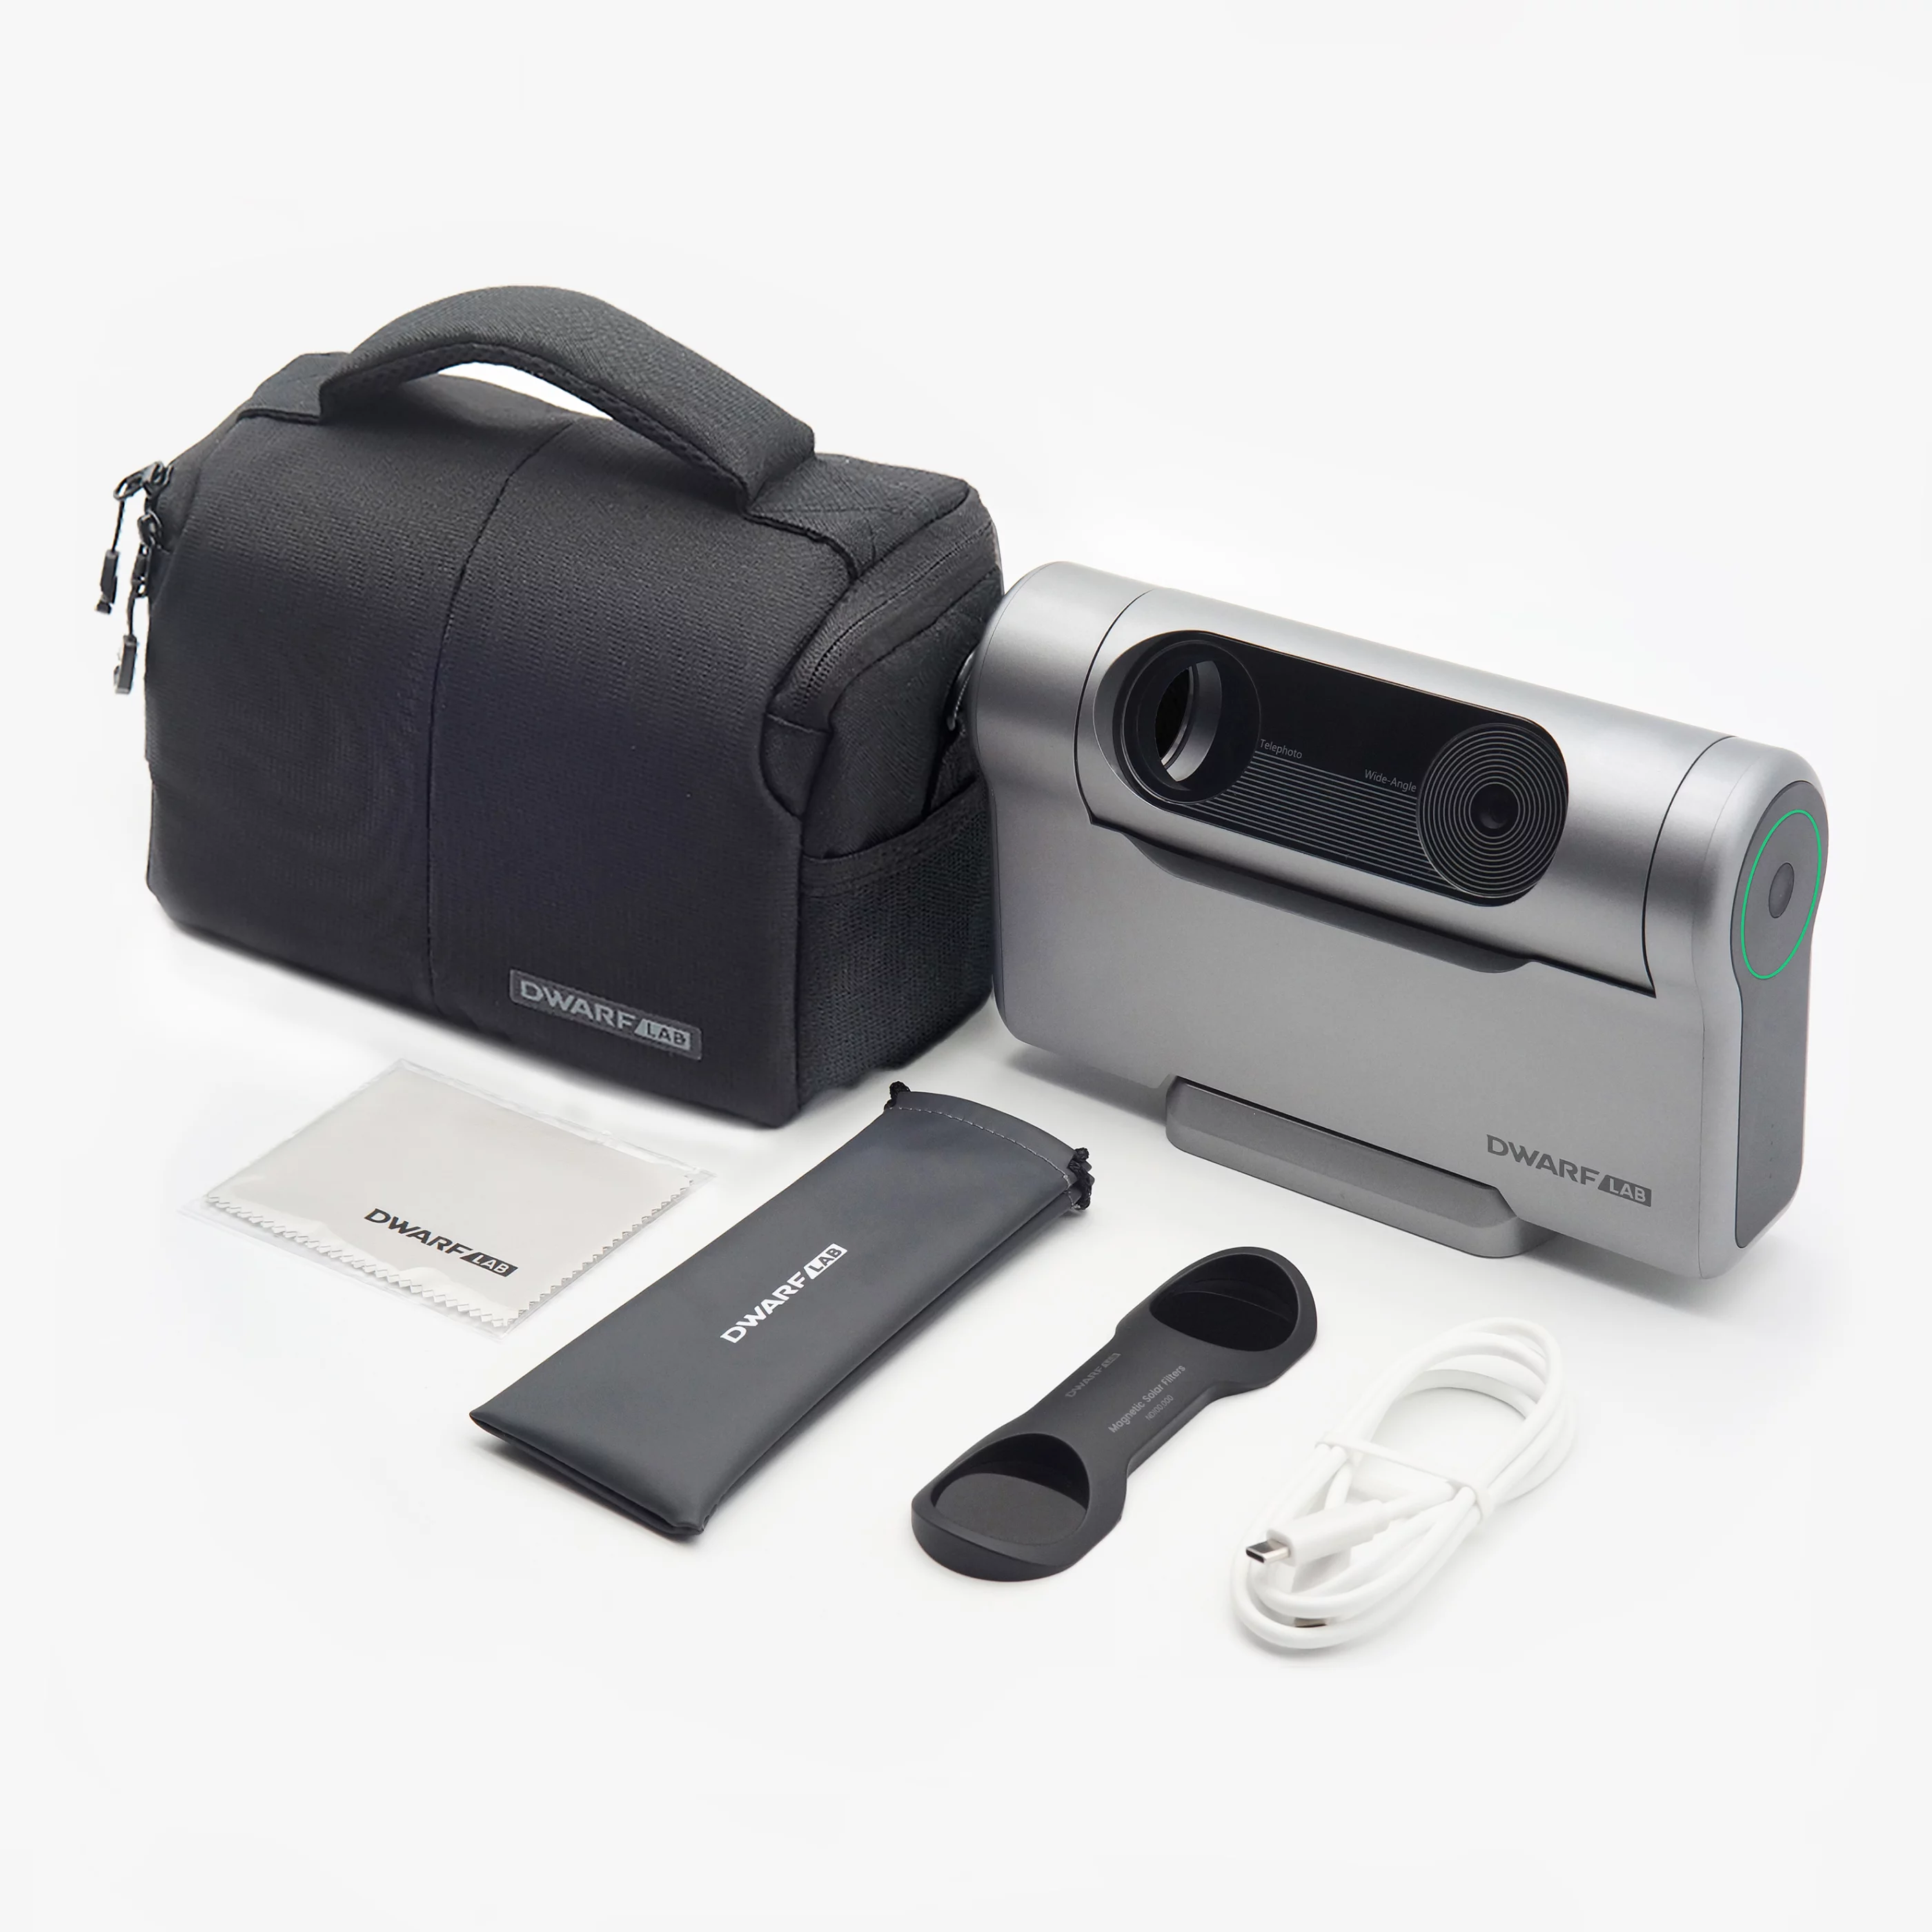
As you've likely worked out, there have been models before the Dwarf III, but this is the first one I've tried. It's fairly compact and lightweight, measuring 222 x 142 x 65 mm (8.7 x 5.6 x 2.6 in) including all of its protrusions and weighing in at 1.3 kg (under 3 lb). The lower portion slims to a girth of 50 mm (1.9 in) and the 115-mm-long (4.5-in) motorized base juts out by 11.5 mm (0.45 in).
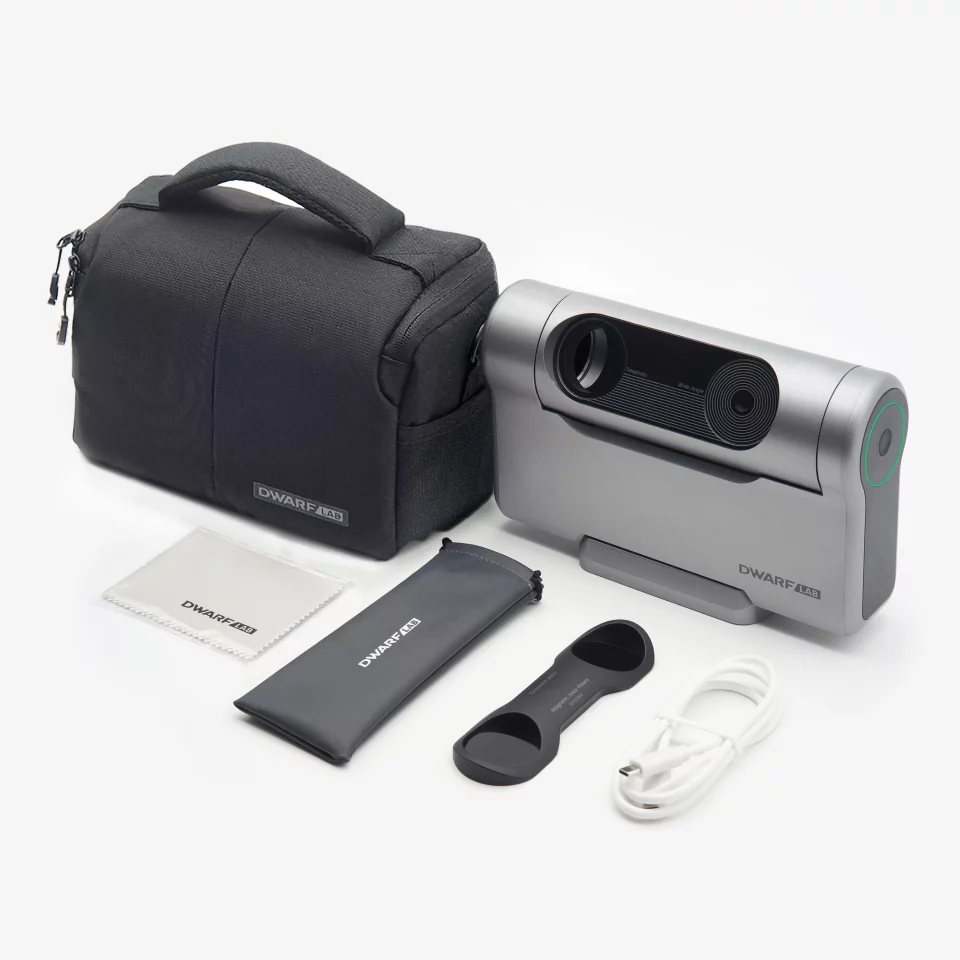
The smart telescope comes supplied with a padded carry bag with room inside for its funky sunglasses – which magnetically attach the the lens module when snapping solar imagery – a cleaning cloth and USB-C cable. A Velcro partition can separate the device from the rest during carry.
The cylindrical top section is home to a 3.4-mm wide-angle lens with a focal length of 6.7 mm (45 mm equiv) and a 35-mm telephoto with a focal length of 150 mm (737 mm equiv), the latter made with low-dispersion glass.
Three filters are built in, starting with the VIS filter that's used for daylight photography and blocks infrared and ultraviolet wavelengths. The Astro filter allows infrared through to the Sony IMX678 (STARVIS 2) sensor but blocks ultraviolet plus some of the visible light spectrum – "about 450-690nm." And finally, there's the dual-band filter. This one is designed for two specific wavelengths – 656.3nm and 500.7nm – which are "highly beneficial for observing emission nebulae."
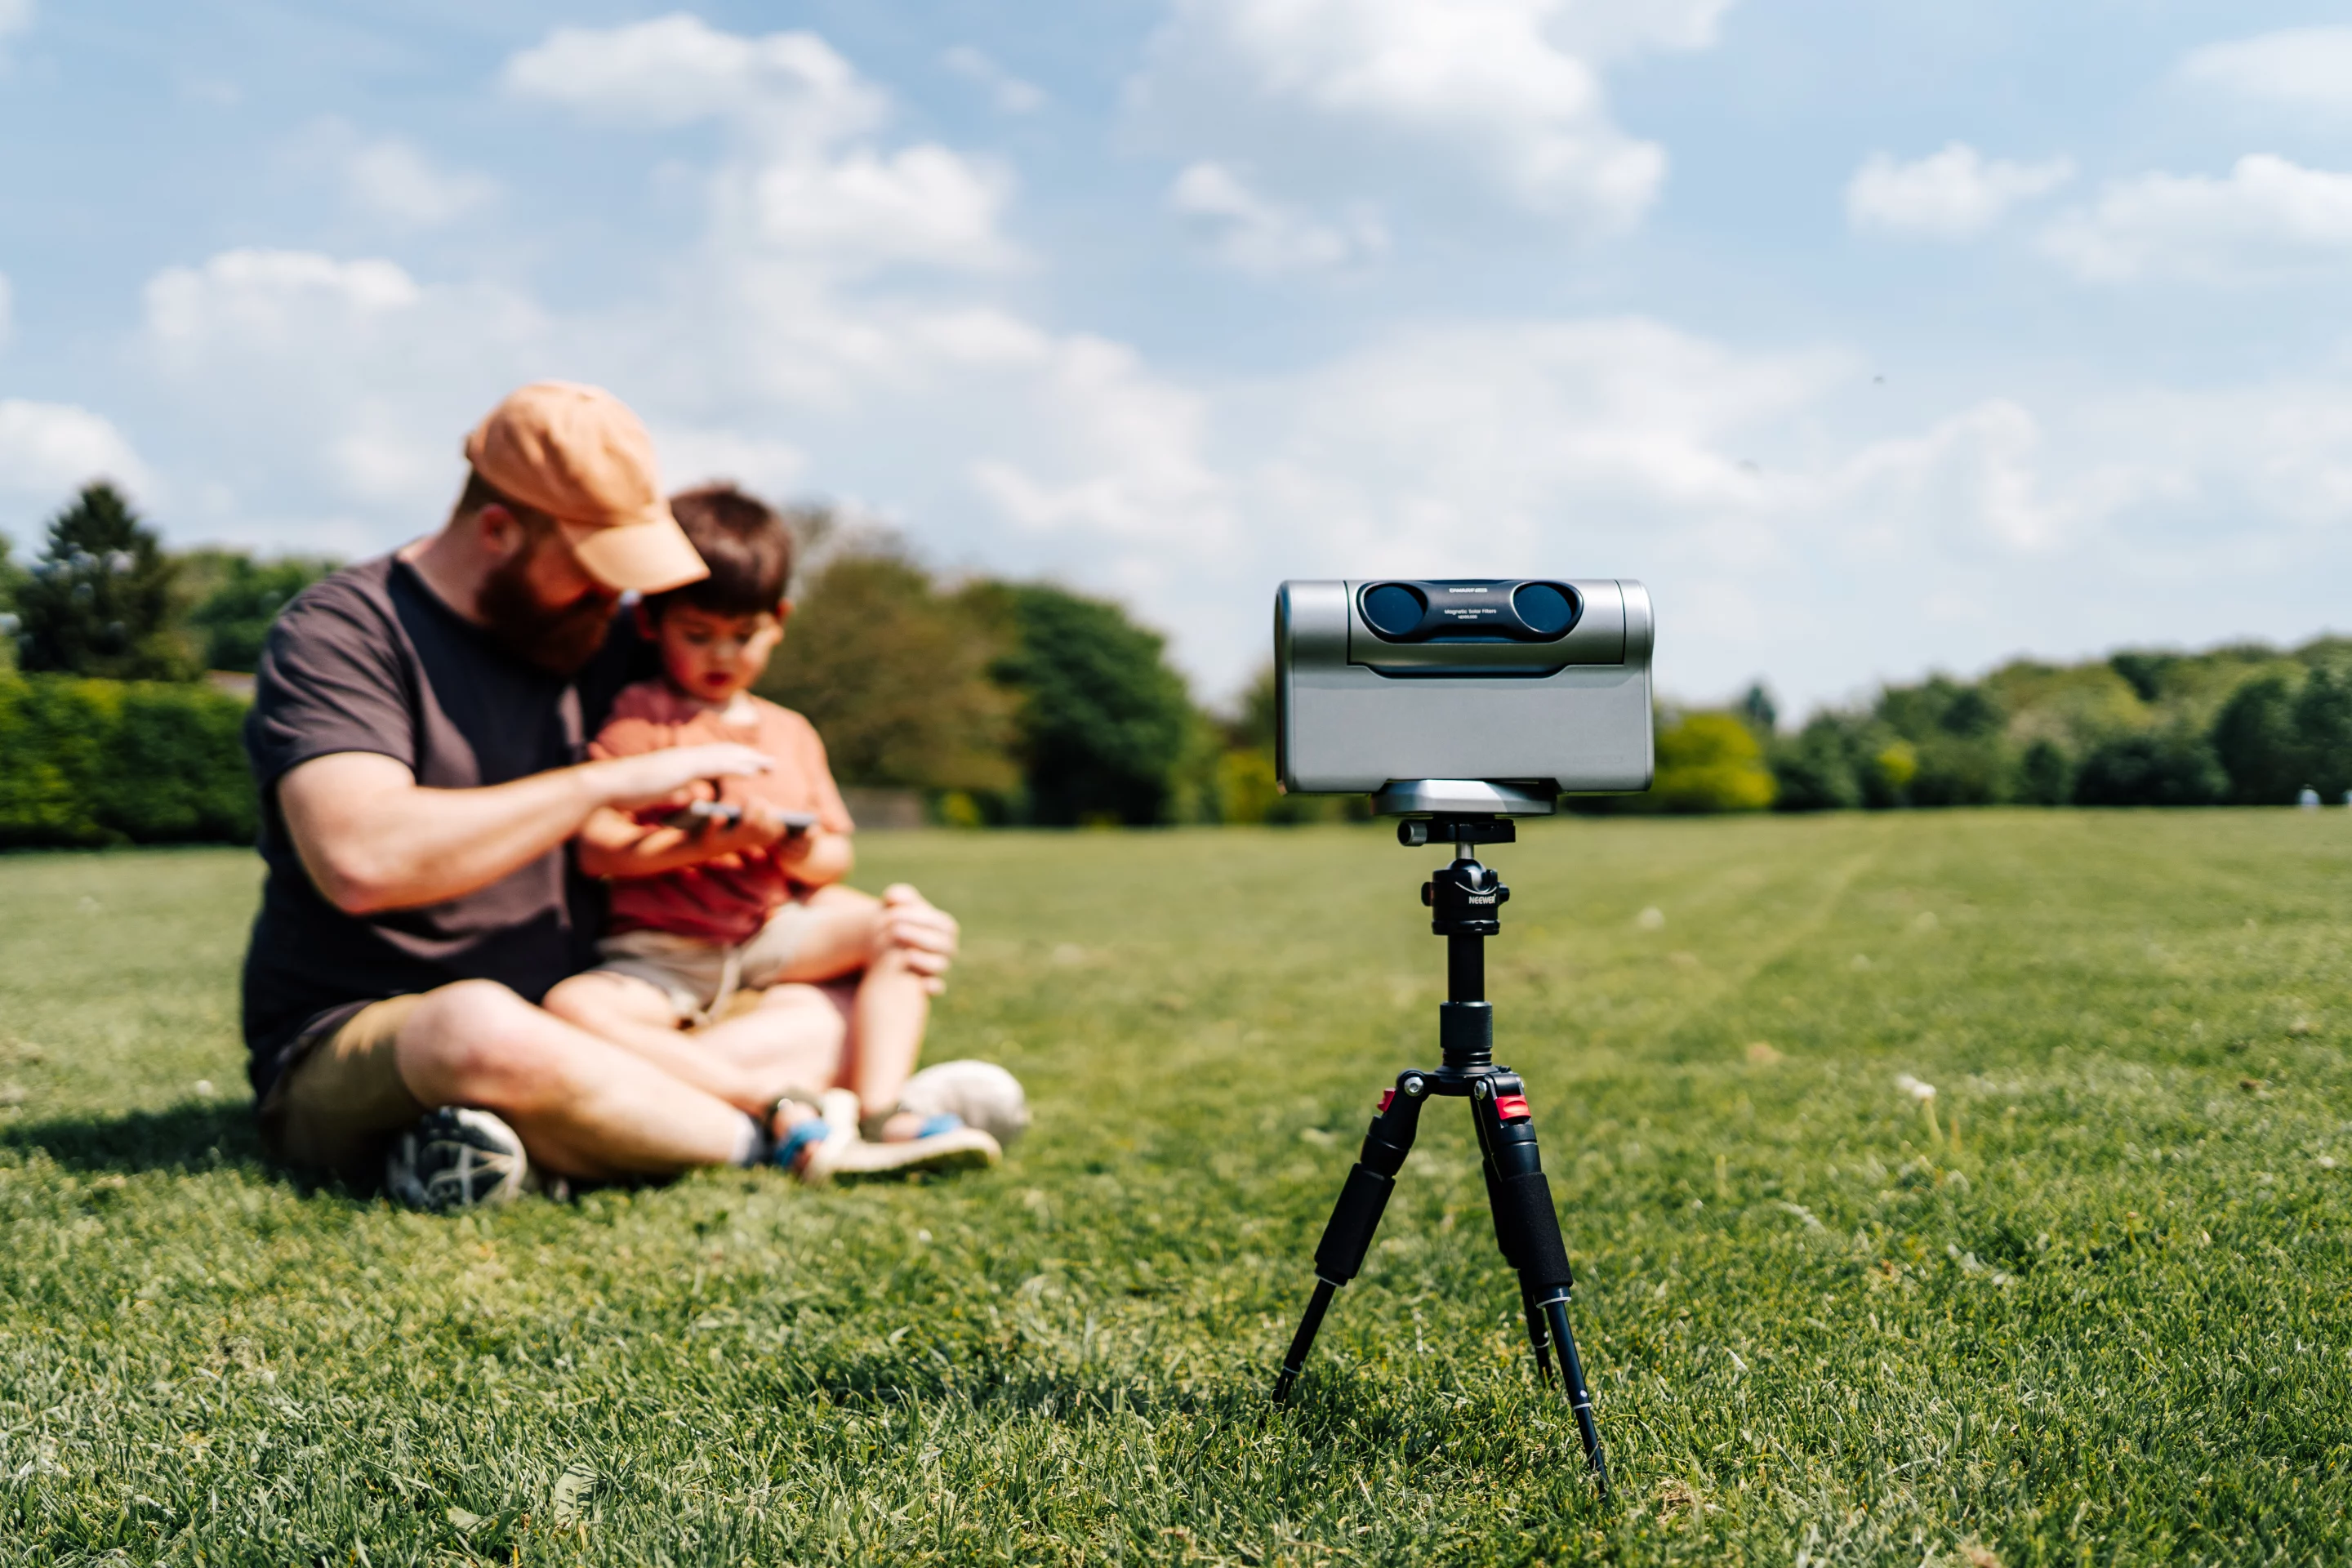
The lens housing component can be rotated manually – as can the base – or controlled through the companion mobile app, which you'll need to use the Dwarf III. Yes, unlike traditional telescopes, where you'd need to look through an eyepiece, smart telescopes like this one fling visuals captured by the image sensor over to a smartphone running a companion app.
The app can be connected to the smart telescope over NFC or through the app itself – Wi-Fi, Bluetooth and GPS/location options need to be enabled on the handset. The smart telescope creates a local Wi-Fi hotspot for the phone to connect to, while Bluetooth is used for verifying connection passwords and activation commands.
In use, I found that the direct Wi-Fi connection had quite a limited reach, which might prove frustrating for those, like me, who like to wander about while the smart telescope does its thing – though the connection is automatically re-established once you get back within range.
DwarfLab seems to have considered this and offers a mode that uses your home router as a sort of relay between devices, instead of utilizing the telescope's direct Wi-Fi. Obviously this feature can only be used when you're within range of your home router, but it does mean that you may be able to control the show from the comfort of your sofa while the Dwarf III sits in the yard.
More than a star snapper
The app makes a number of imaging modes available. Photo mode enables daytime wide and tele photography, object tracking, and Sun or Moon tracking. Such things are accessed via the Function icon on the app's viewing window interface – which is also where parameters like shutter, gain, white balance and so on can be tweaked for both the tele and wide lenses.
This viewing window launches with the big picture as seen through the wide-angle lens taking up much of the screen, and a smaller box with the telephoto view to the top left. Tapping on the smaller box switches the views over, and a box to the left removes this window from the app's interface for an unobstructed view of the main window.
The general idea is to use the wide lens to locate and select a subject from the expansive view, which the tele lens then zooms in on. Users can also move the onscreen joystick for precise control, with a speed wheel determining how fast the focal point moves around.

For my daytime shots, I opted to visit a country estate and gawp at some deer. I've been snapping photos for a long time so this part of the Dwarf equation proved fairly intuitive and familiar. I used the wide lens and the autofocus to sharpen the scene, and then the long reach of the tele lens allowed me to get close to the grazing action without disturbing the herd, though some did eventually wander over to see what all the fuss what about.
Tracking those curious movers involved simply drawing a box around a subject after selecting the object tracking feature in the Function menu. As mentioned earlier, the app caters for adjustment of photo parameters, though I went with default options for the most part.


I had a friend with me on this mini adventure, who used his Nikon DSLR sporting a 600-mm lens. When we compared pre-edit previews, the Dwarf managed to get a bit closer – though the D750 won the image quality game hands down. That's not to say the Dwarf's images were poor, they just couldn't compete with a full-frame camera.
Video mode is similar to the Photo mode, and offers 4K video capture through the telephoto lens at 30 frames per second and 1080p/60fps via the wide-angle lens. The Burst mode allows the user to set the device to snap a number of consecutive frames with a selected time interval between them.
Time-lapse mode can take multiple frames across a set period, and Pano mode can generate a bunch of images for stitching together into a – potentially gigapixel – panorama. Watching the Dwarf do a robot dance as it snapped multiple images for the panorama test proved quite a crowd pleaser, and led to many conversations with passers-by.
However, the device doesn't yet have the ability to stitch together all of the separate photos into one huge vista – that's in development. So you'll currently have to download the whole lot to a computer and stitch them together yourself in editing software to produce a complete panorama.
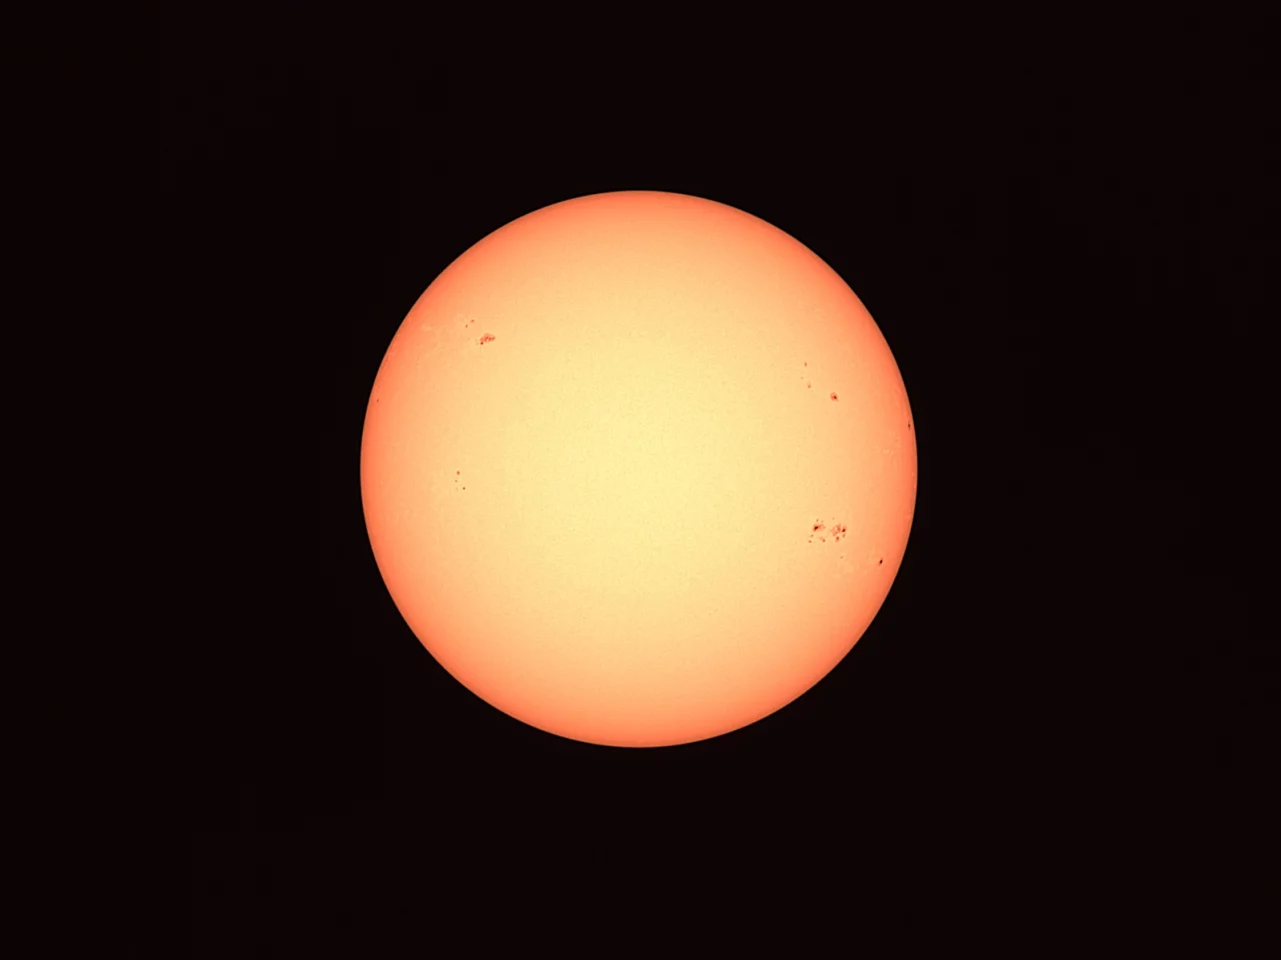
I popped the supplied ND filter sunglasses onto the Dwarf and selected the Sun tracking mode before firing off a few stills, which worked quite well and even managed to catch some spots. It's also possible to engage Astro mode for Sun shots, where you'll need to fire up the Sky Atlas, select or search for our native star and then set parameters via the Function menu before hitting the red button to let the image stacking begin (more on that later).
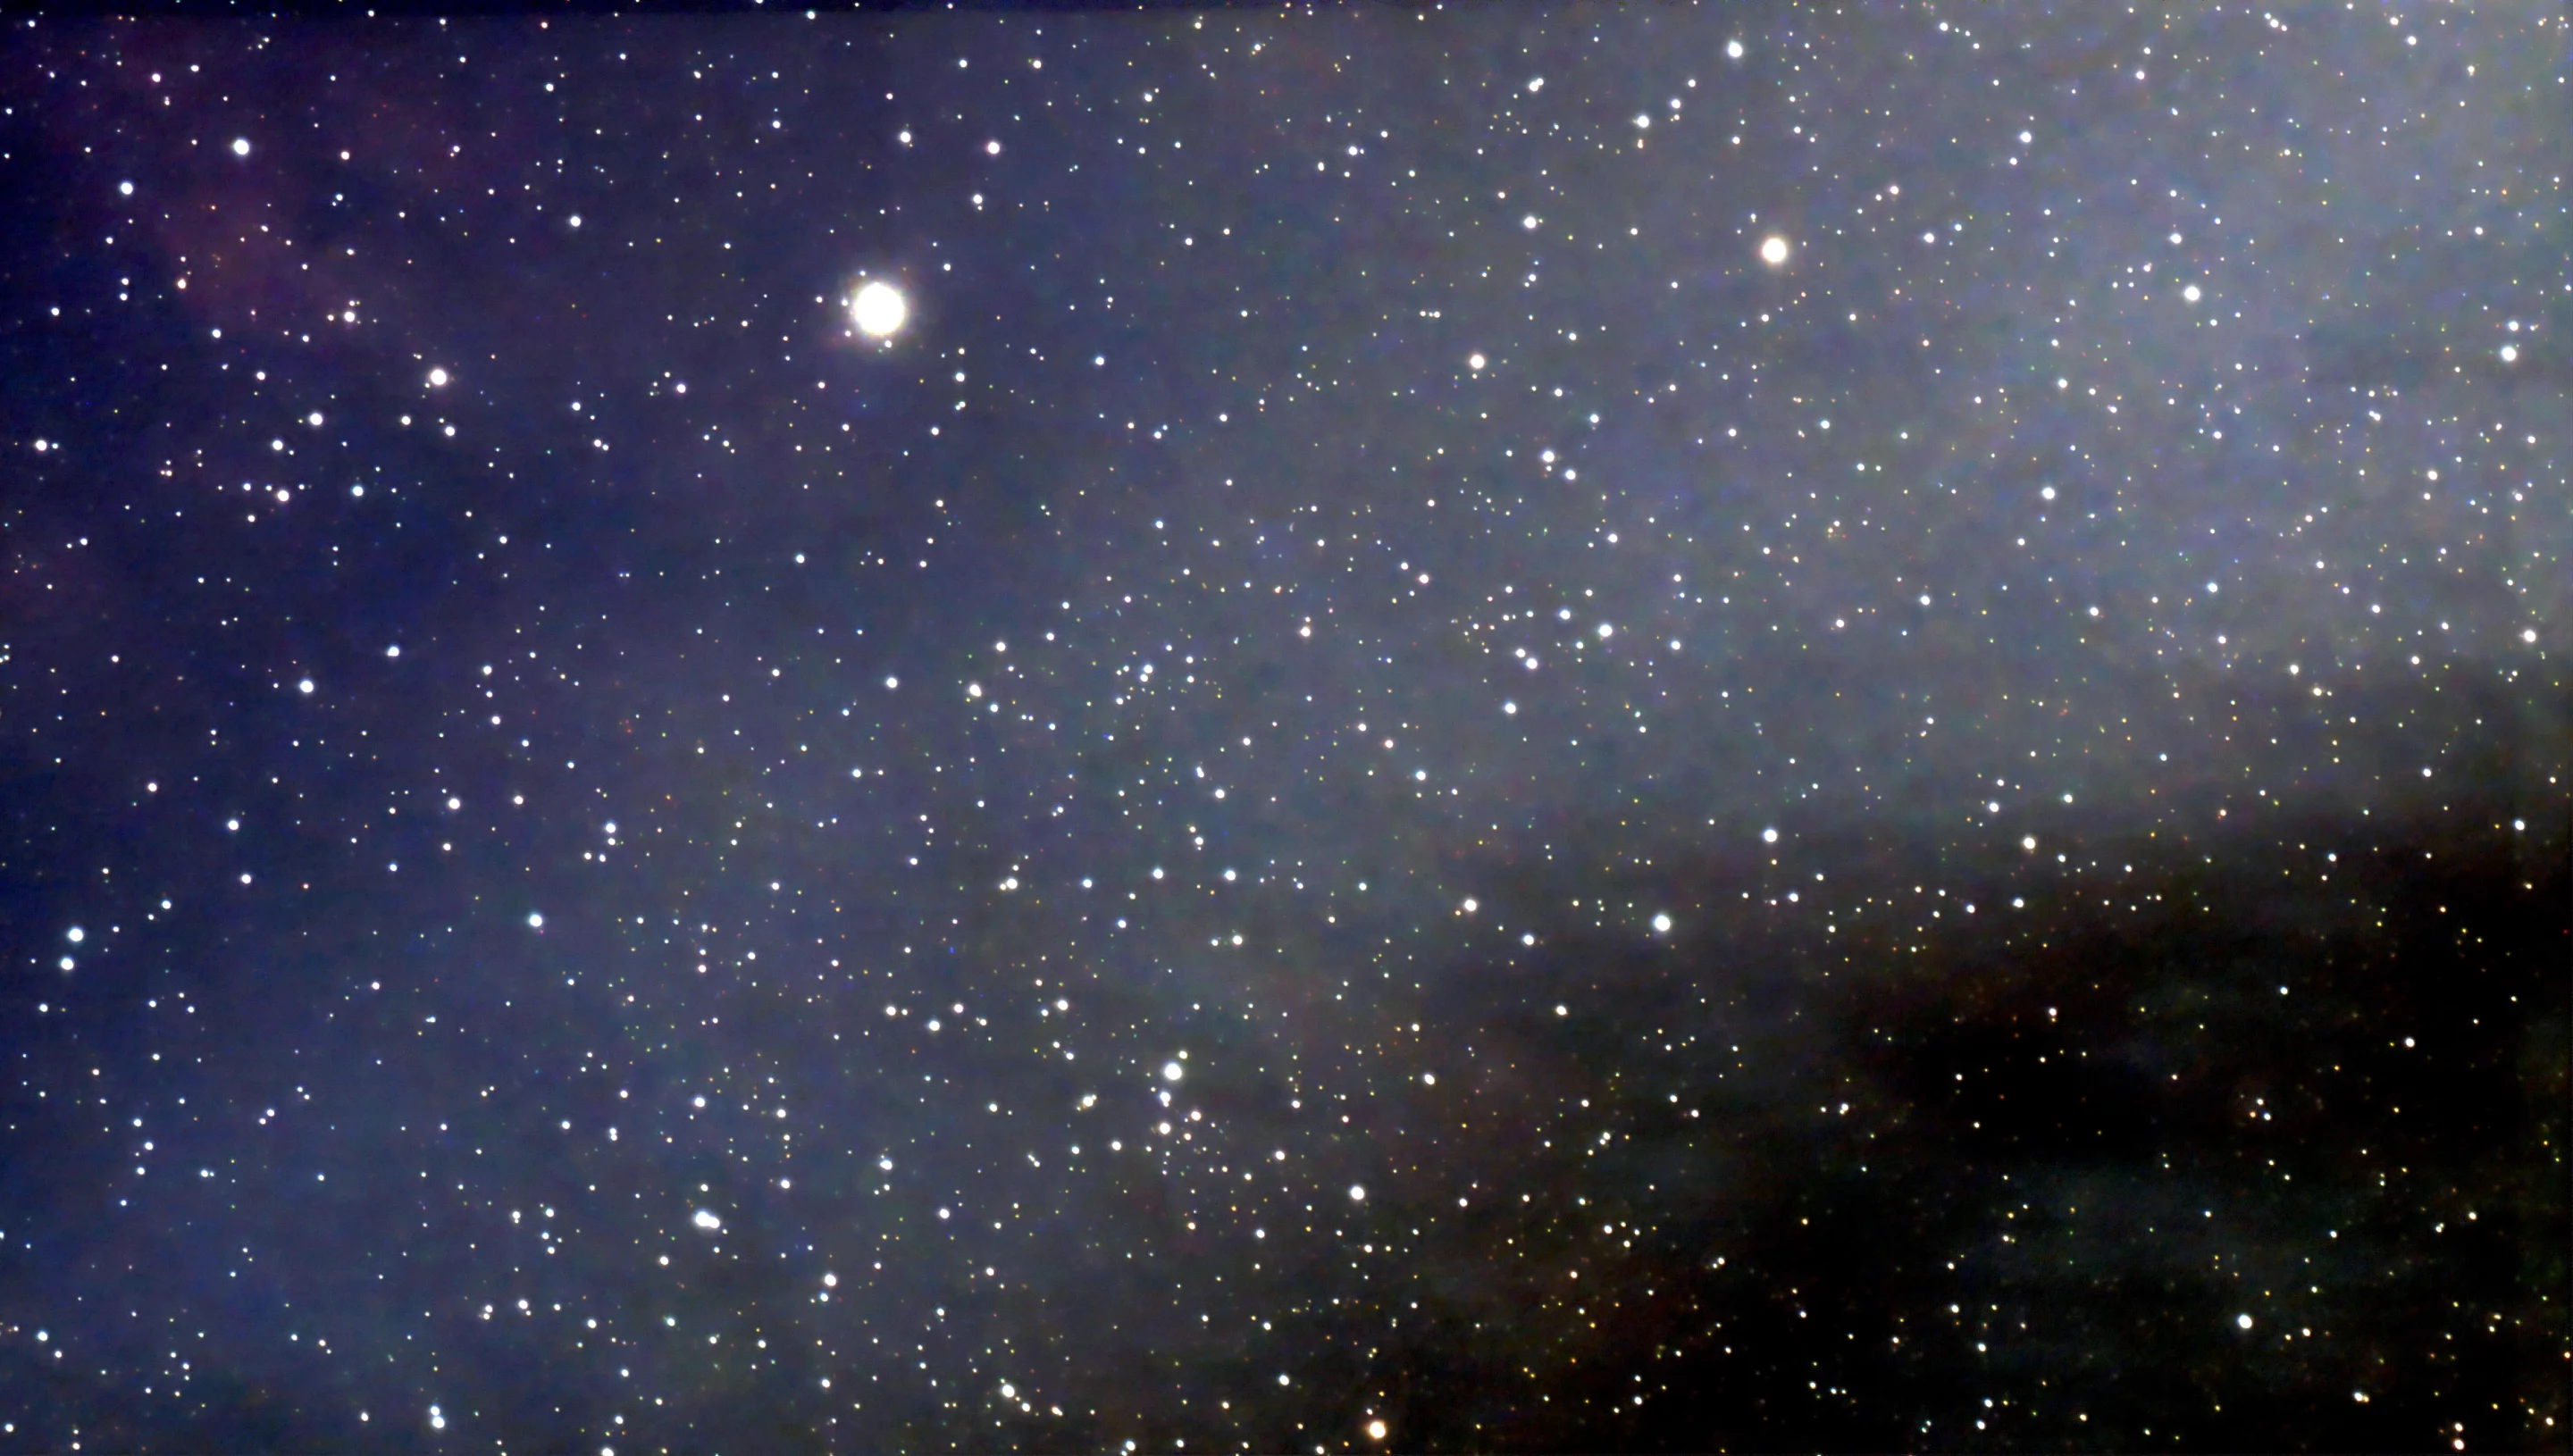
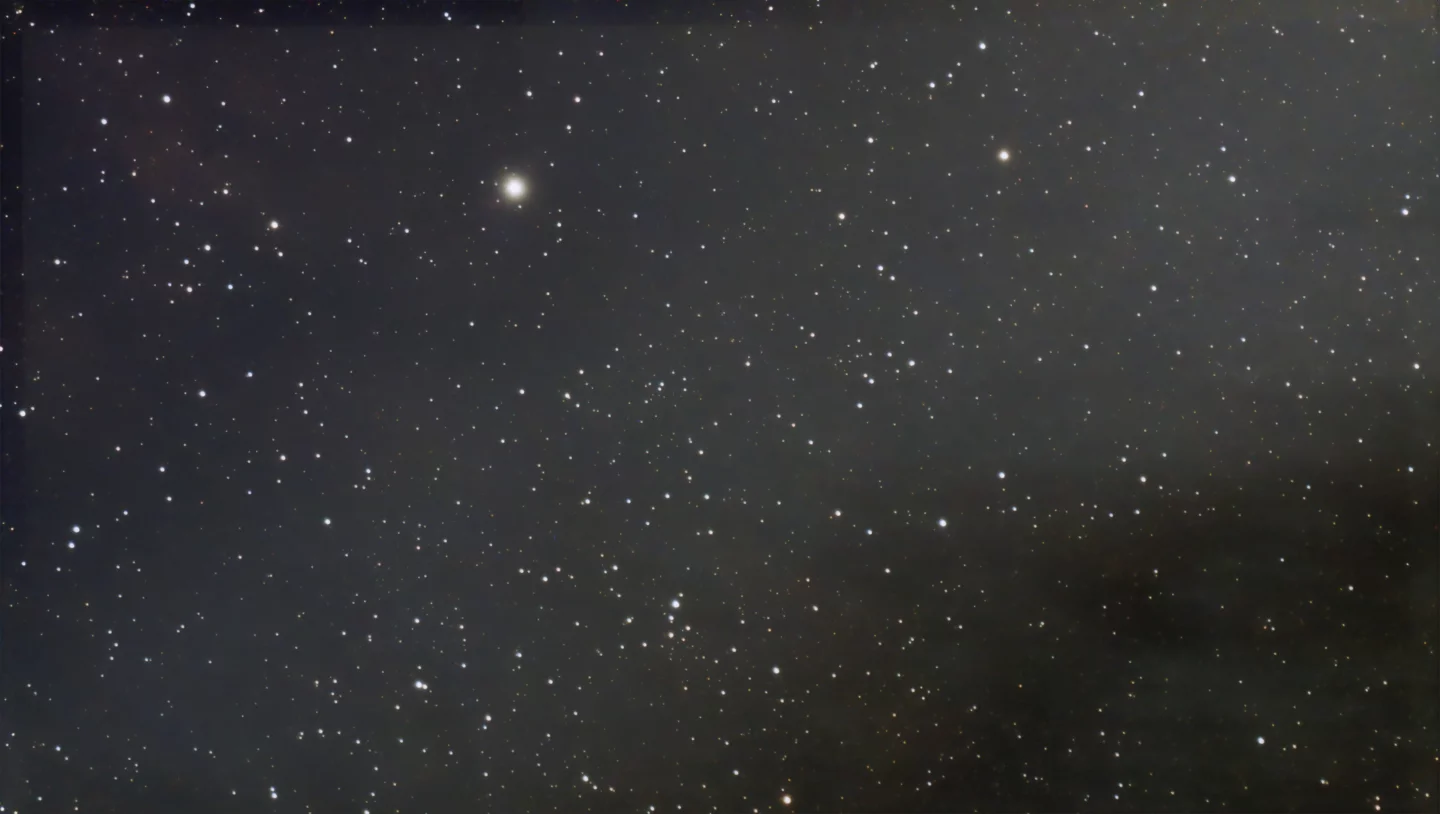
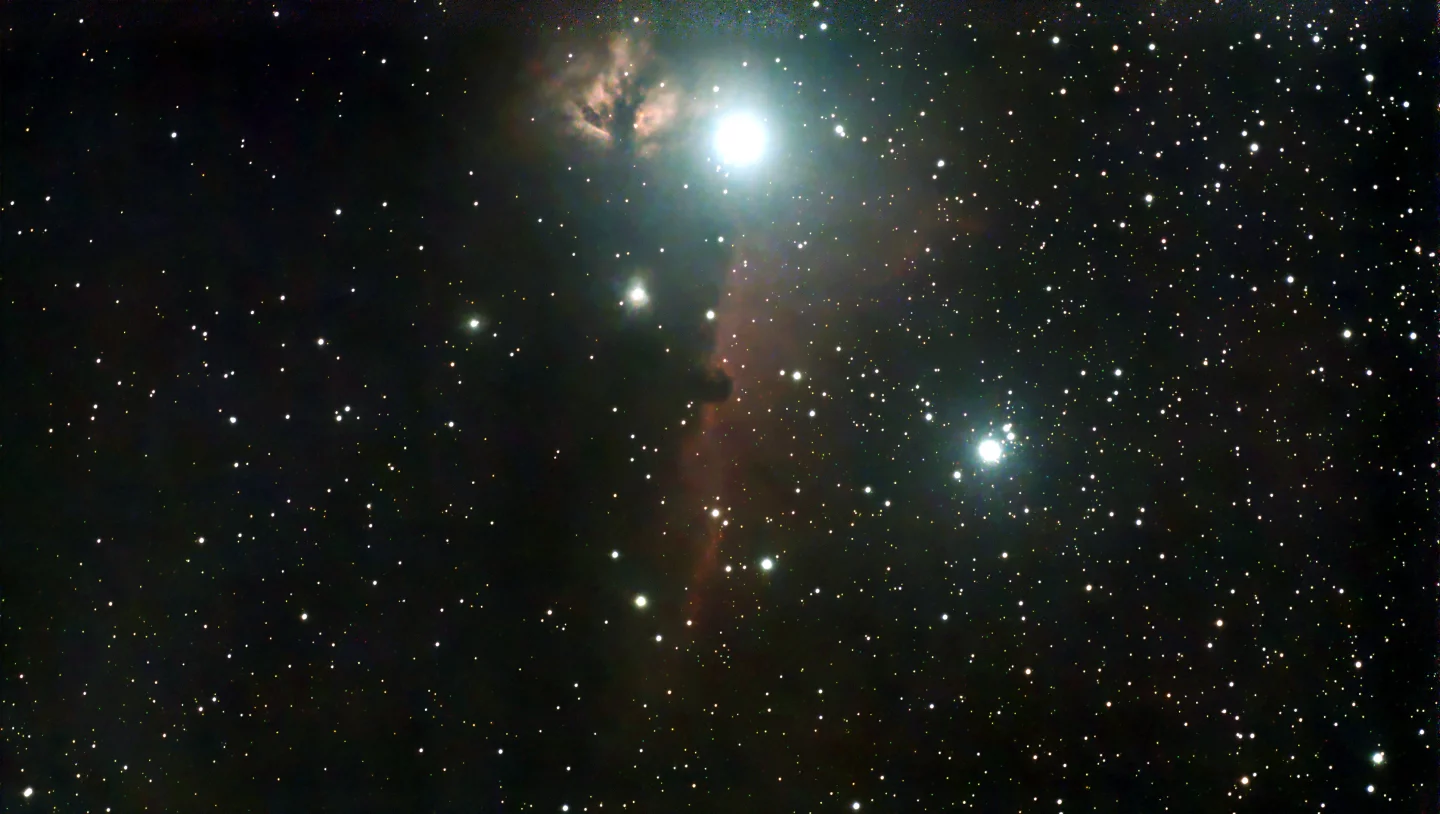
It's a similar process for tracking and capturing the Moon, though the ND filters aren't needed and the session needs to take place after dark, obviously. I was fortunate to be outside when our local satellite put on a pretty good show, which you can see below.

Finally, there's also an Auto-Capture mode for detecting and tracking birds and other objects like unexplained bright lights in the sky. I can confirm that the system tracks moving birds pretty well, but ET decided to stay home so I didn't get the opportunity to try my hand at UFO spotting.
Getting chills for astro exploration
Before heading out for my first after-dark astro session, I read the very long user guide and would recommend doing the same – though I did find myself stopping to perform a number of online searches along the way, as well as watching a few videos, in order to better understand some of the concepts involved.
My time stargazing with the Dwarf III has taught me a few important lessons. First, astrophotography can be a complicated and time-consuming business. Next, that trying to review a smart telescope in winter is very challenging. Not only was it bloody cold when I did get out with the device, but the weather is very much the enemy for this kind of endeavor – I lost count of how many evenings started with clear promise and purpose, only to be spoiled by clouds moving in.
On the occasions I was graced with clear skies for the duration, setting up the Dwarf for deep sky shots proved a little more involved than the comparatively simple process of snapping photos during the day.
First challenge – in order to help improve astro results, the device needs some dark frames to help denoise the otherwise inky black background. This involves turning the unit's external lights off via the app, attaching the ND filter and pointing the lenses down into the body. But you also need to match shutter and gain settings to the parameters of the shooting session you're embarking on, so multiple darks will be needed.
The process is accompanied by onscreen prompts, but the whole thing kind of assumes that you know exactly what you're doing and have already thought about the settings needed for your upcoming astro adventures – which, being a complete novice, I didn't and hadn't. Fortunately, the device does come with a few darks built in, and will prompt you after you've selected your target and are setting up your shot if new darks are needed.

Next challenge. The Dwarf app includes an equator mode that aligns the unit with the celestial pole to cancel out the effects of the Earth's rotation on target tracking, for improved stability as well as accurate views in the Sky Atlas and object tracking accuracy.
The app provides helpful prompts on how to adjust your setup to make the EQ mode happy. But I didn't have a compass to hand, my tripod didn't include tilt angle information (the Dwarf III doesn't ship with a tripod, so you'll need to buy your own), and I couldn't find my protractor, so this proved to be quite a tricky process involving much trial and error,. Mostly error.
Once your darks are in the bag and your EQ angles are all set, you can click on the Sky Atlas to open a localized map of the heavens to zero in on your target. The view here can show a grid, display "the state of celestial bodies under current weather conditions" and make the horizon clearer by simulating a landscape – each of these can be deactivated onscreen too, if preferred.
You can simply wander around the Atlas by sweeping a finger across the screen and choose something that takes your fancy, or you can hit search if you know the name, designation or coordinates of your desired target. Usefully, the search does include a list of recommendations that should be local to you, as determined by your phone's GPS location data. Each entry is accompanied by additional information about the target, and you can also click the heart box to save favorites for later.
Hitting the camera icon next to a target initiates a one-click go-to feature, which will start calibration to help make "your astrophotography process safer and more accurate, ensuring every GoTo goes to the correct location." This can take a good while to complete, but can be disabled in settings if you're in a hurry.
Then the app will return to the viewing interface, where the parameters such as shutter, gain (essentially the equivalent of ISO) and stack count can be set via the Function option. You can opt for just a single shot here, but stacking images should yield better results. I'll be honest, I didn't really have much of a clue which settings would work best for each session, so ended up selecting from a bunch of presets and leaving the stack count at the default of 999.

The VIS filter option will need to be switched for either the Astro or dual-band modes before pressing the red button to start the astro party, depending on the kind of celestial beast you're aiming to capture. Then it's just a case of stepping back and letting the Dwarf do its thing, which – depending on your parameter tweaking – could take a long, long while.
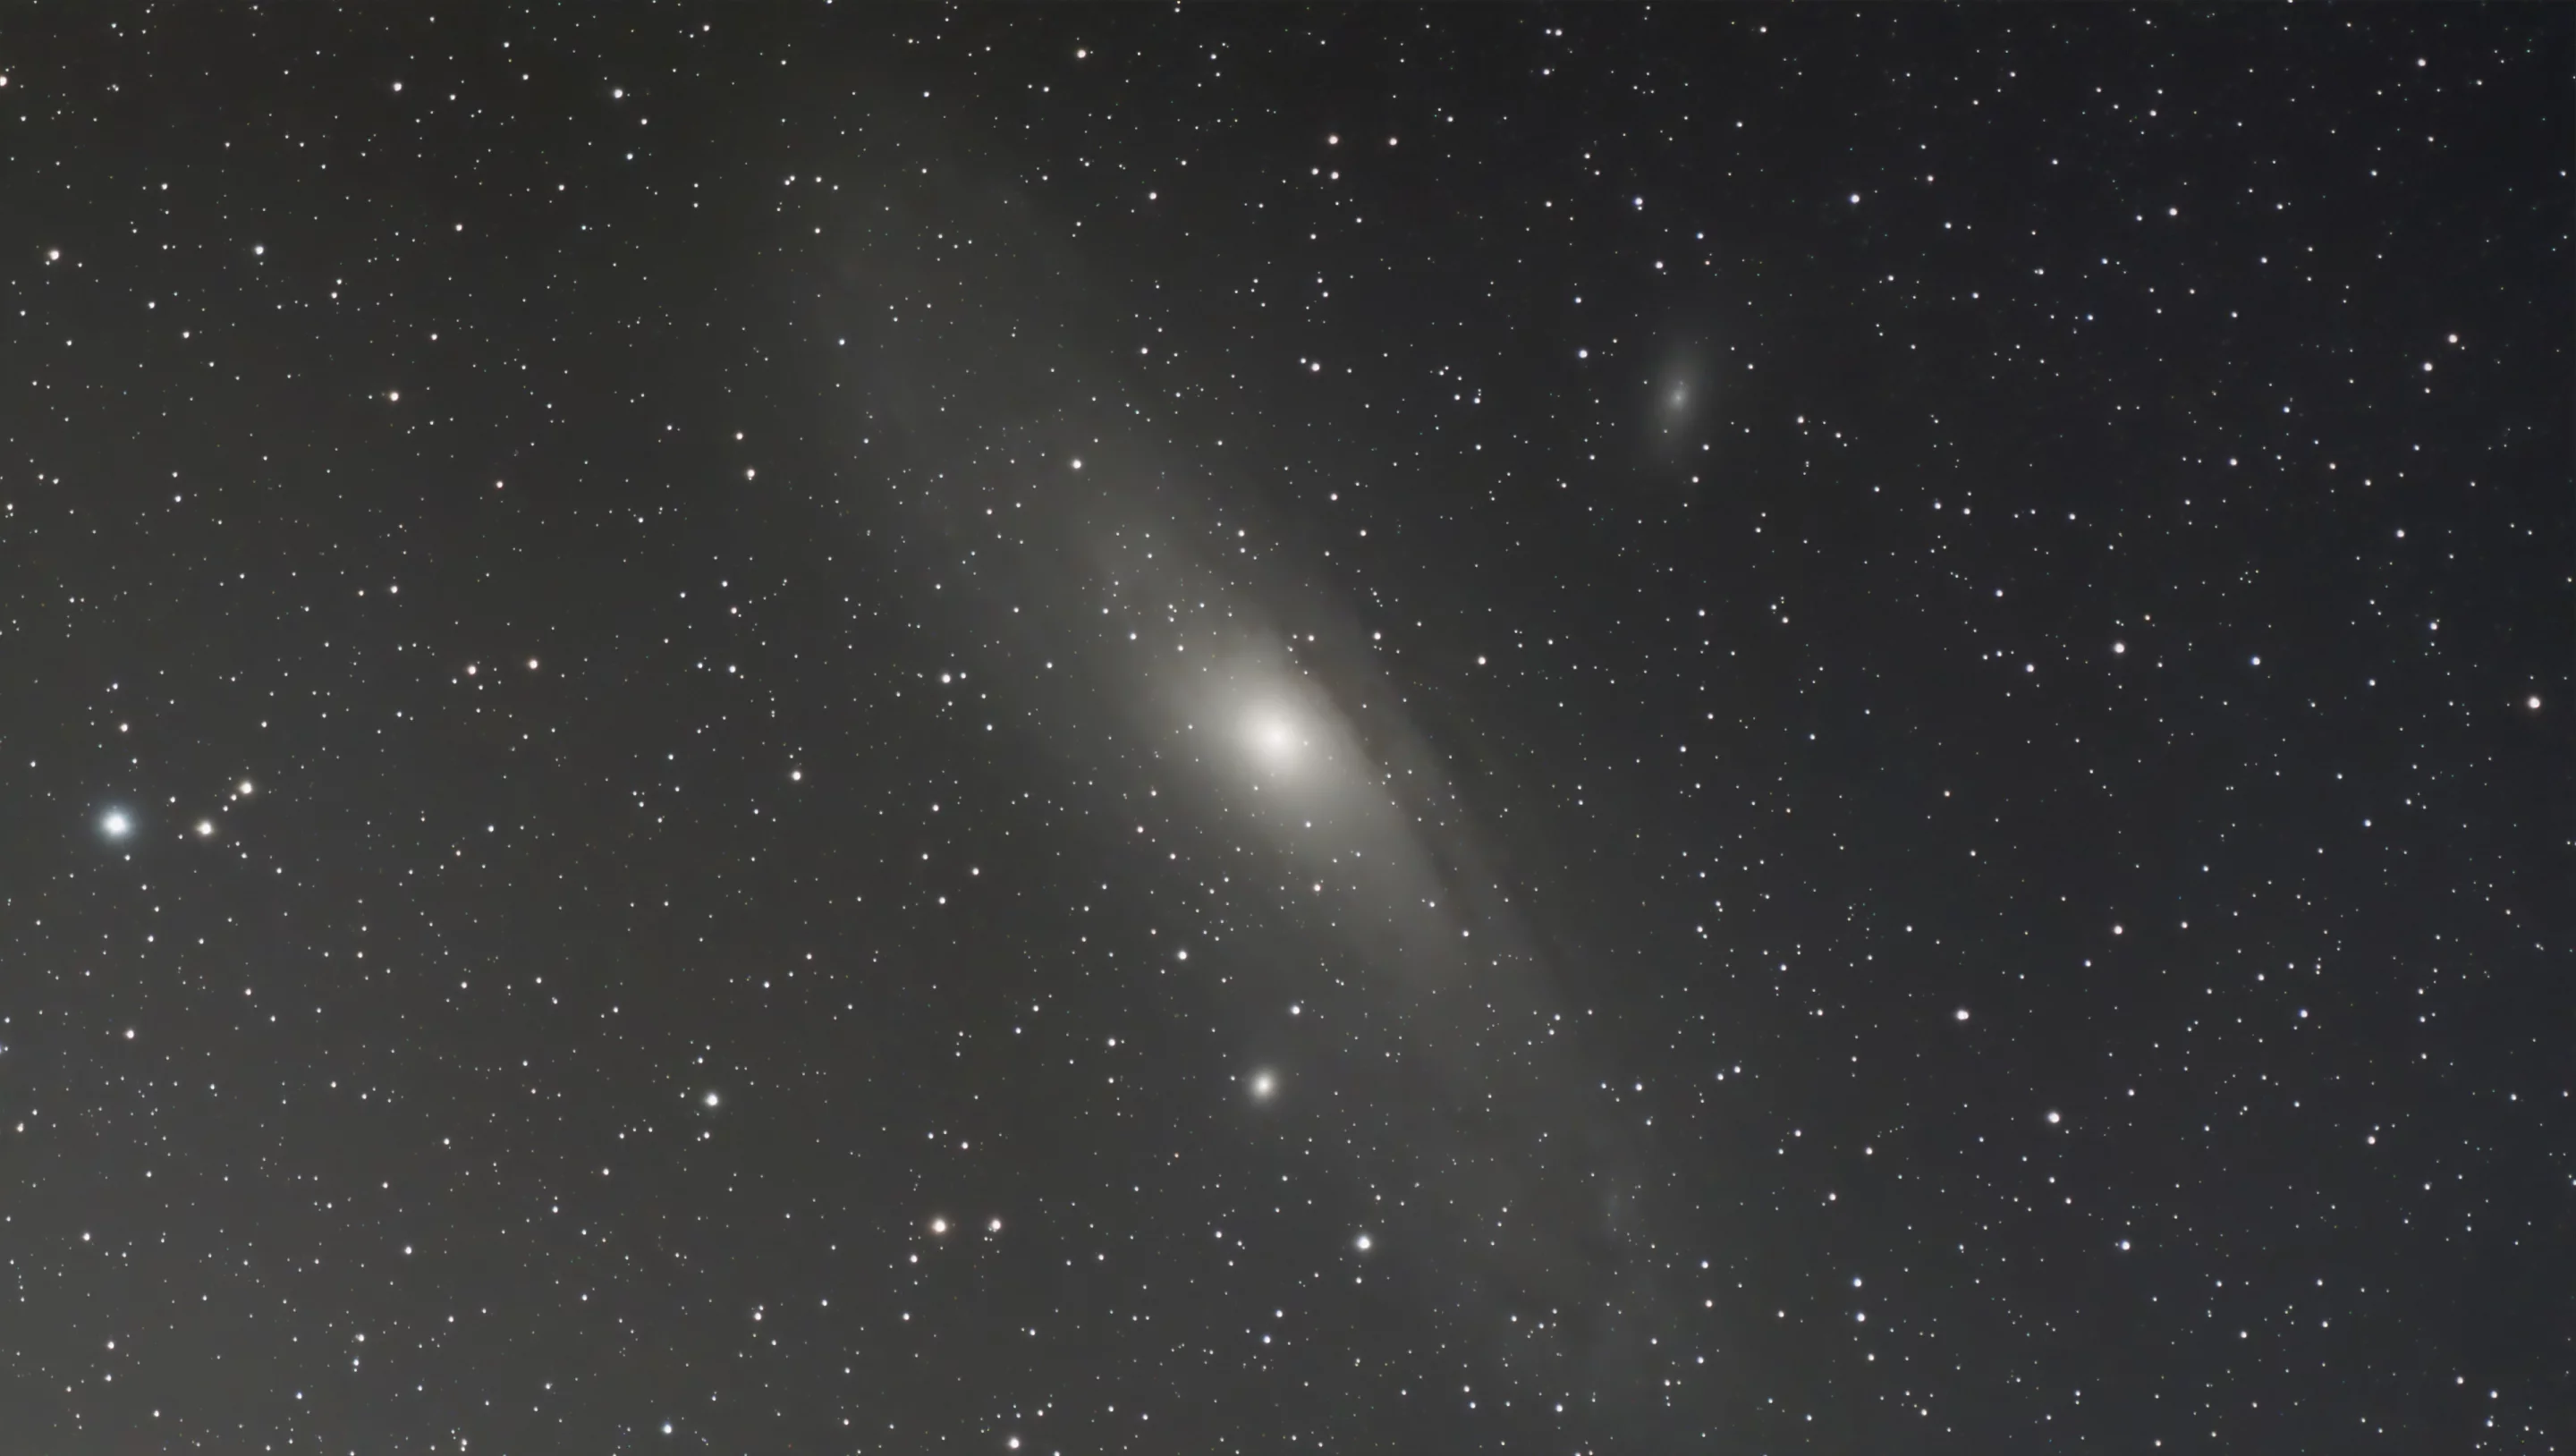
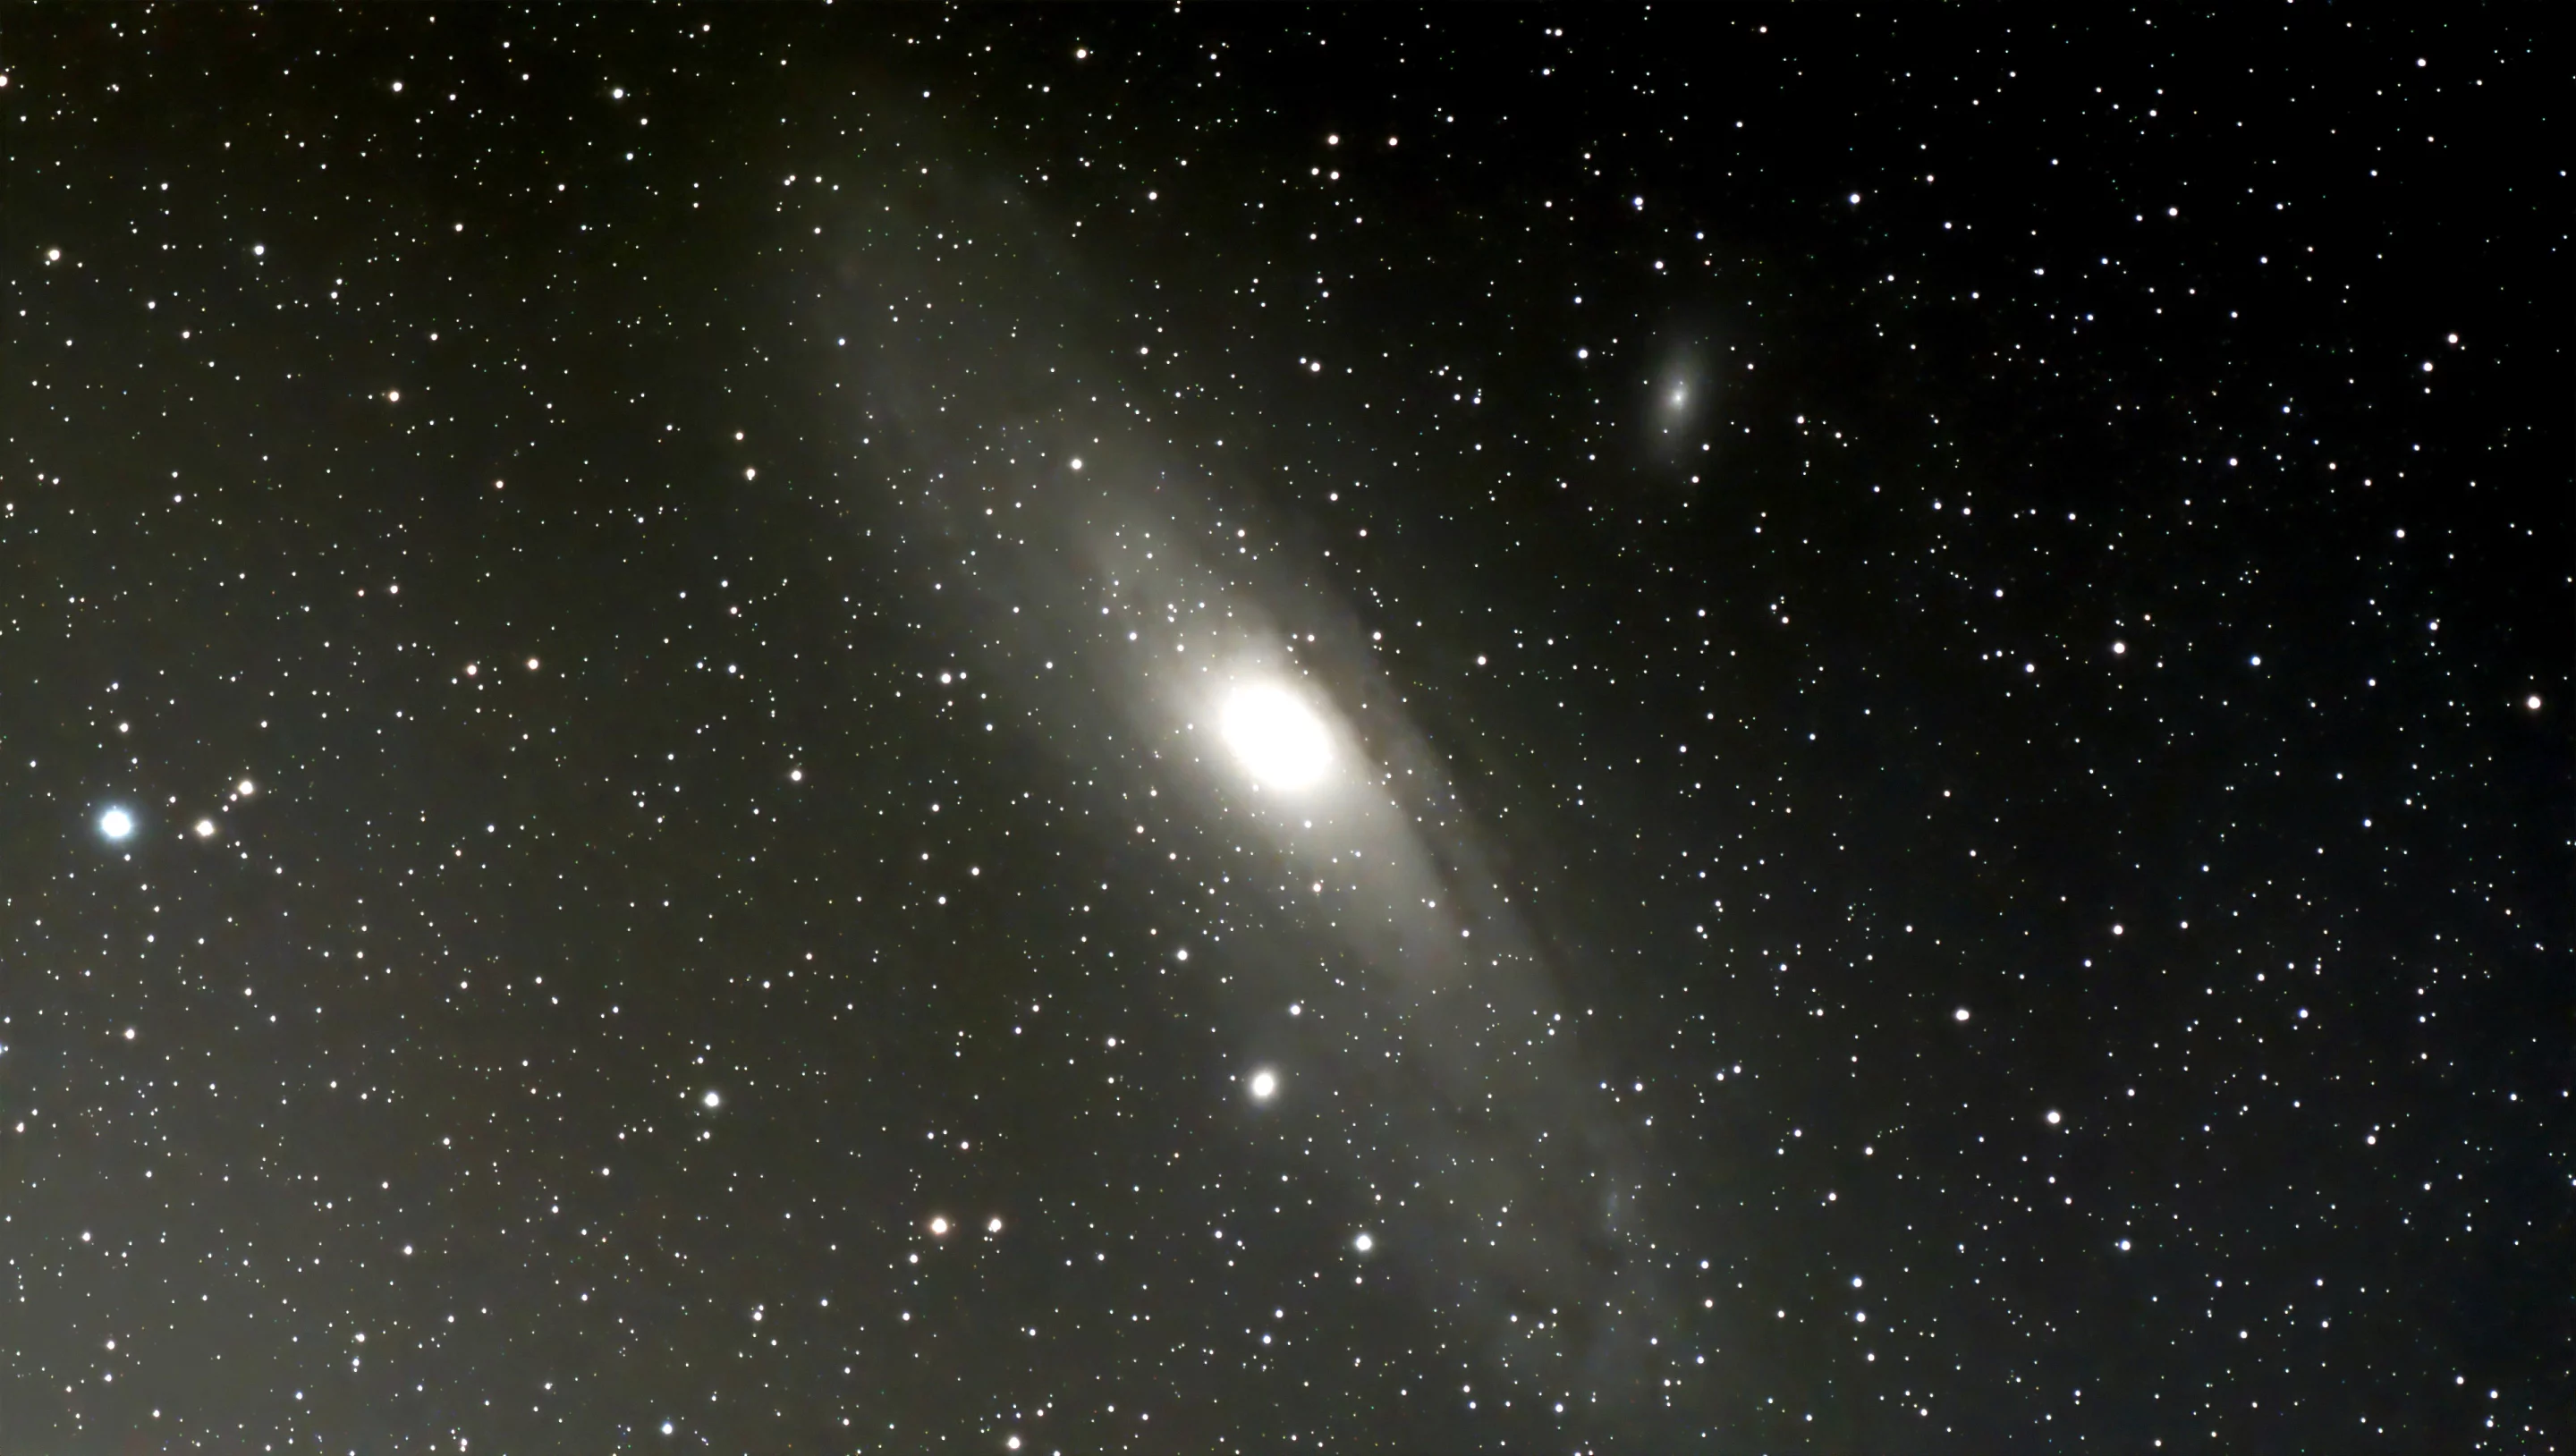
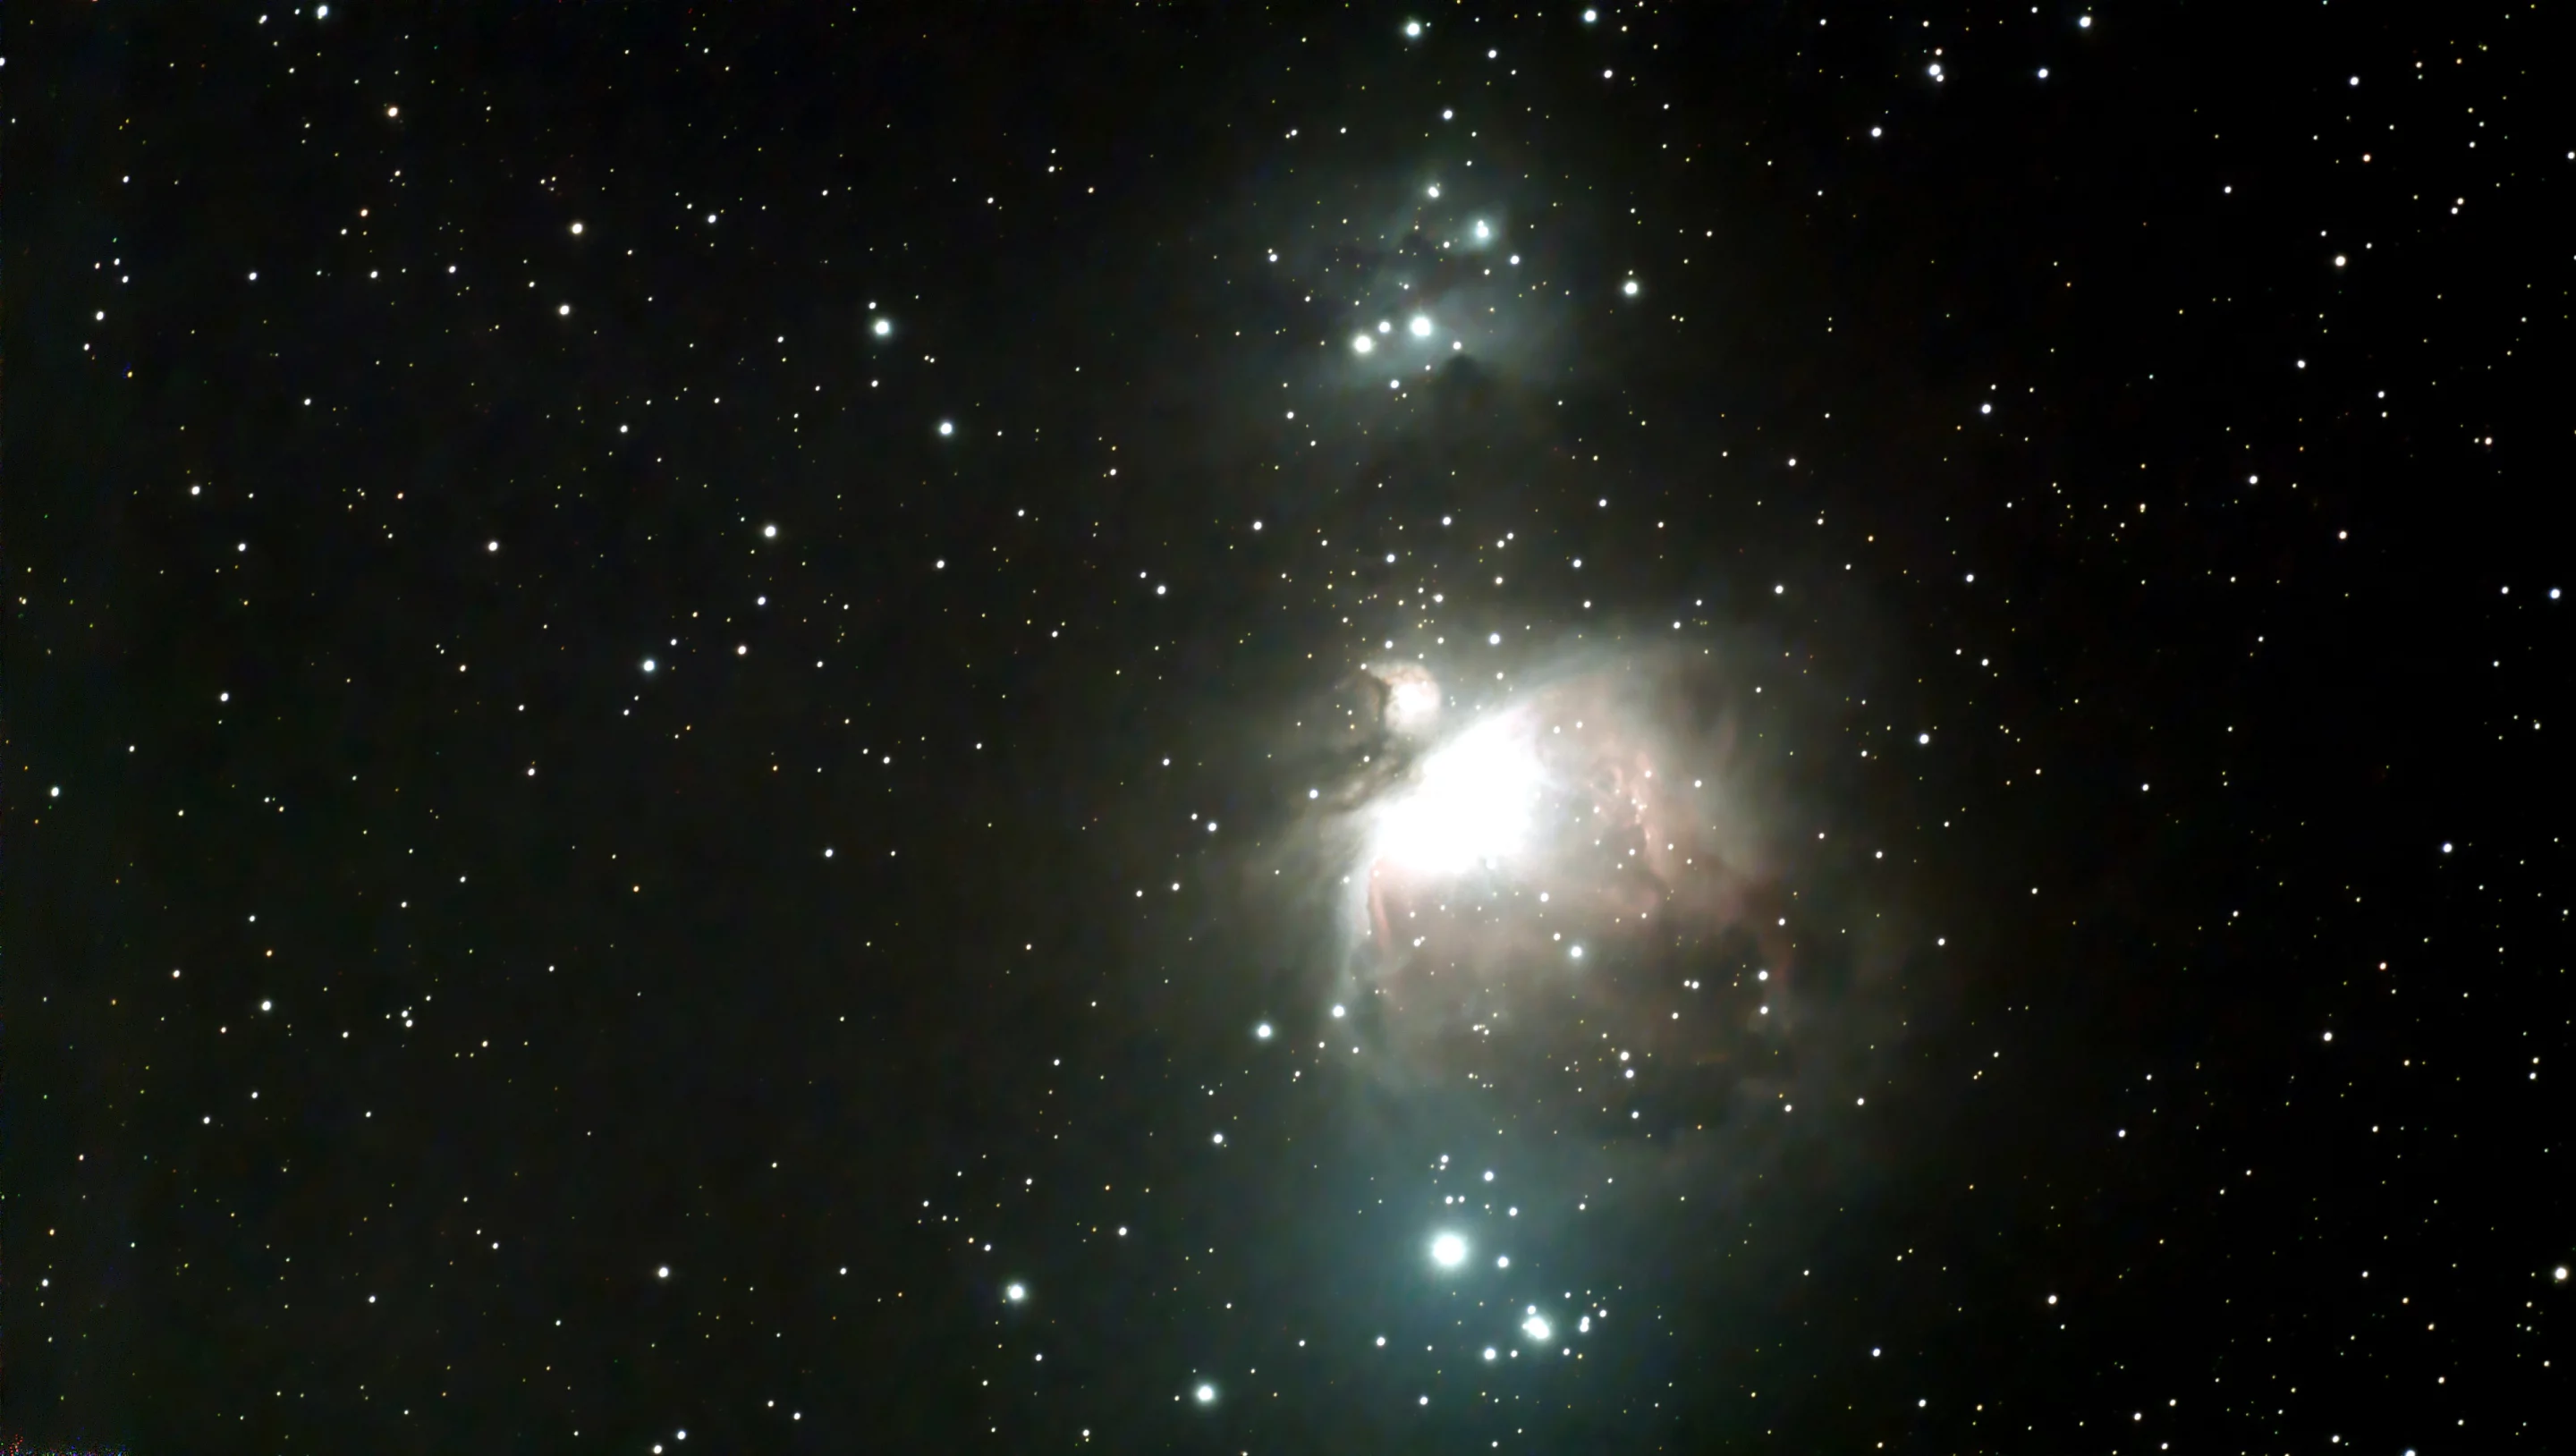
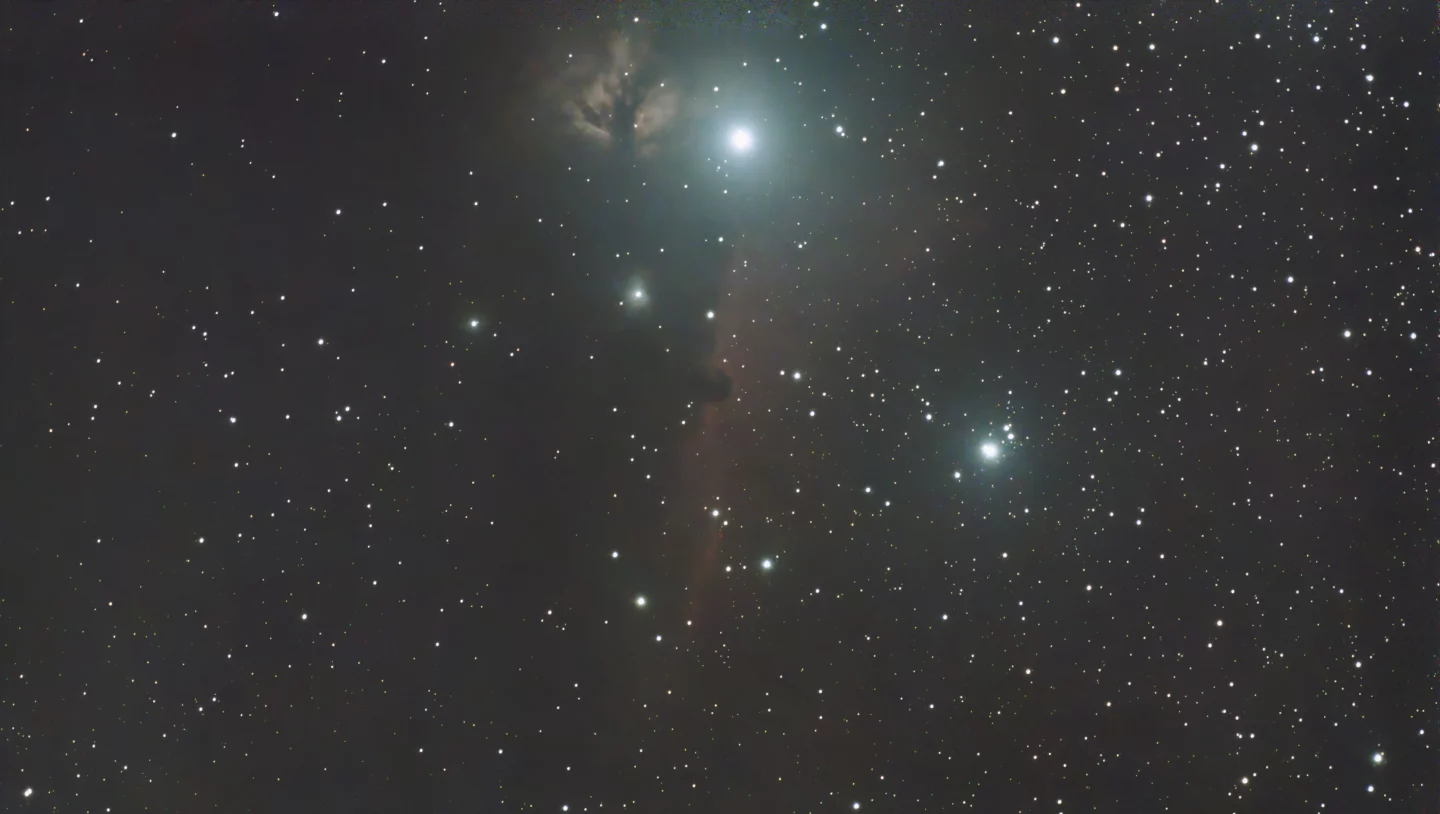
For example, I chose a preset with the shutter and gain both at 60 for a deep sky image, and after more than an hour of snapping and stacking, the Dwarf had only captured around 70 images. The moral of this story? Patience is a definite bonus for astrophotography, but luckily I'd hauled along my trusty e-reader, flask and camping stool so the time flew by.
During a session, it's possible to tweak the color curve to improve the colors and brightness, and there's a handy reset button if you don't like what you've done. Sessions can be stopped at any time by pressing the red button icon again. The app will then employ its AI denoising algorithms (which are only engaged to clear out noise from an image, it "will not add any synthetic data or AI-generated content to your images") before presenting its combined stack image and saving it to the album.
You can also choose to take astro imagery using the wide-angle lens instead of the telephoto, though you'll currently need to set everything manually and the telephoto lens will be used for tracking.
Captured imagery is saved on the 128-GB eMMC storage of the device itself, which means that your precious smartphone memory isn't quickly eaten away by huge stack monsters. But you'll have to subsequently cable the Dwarf to a computer over USB-C and dump the content there for sharing as is, or for sprucing up in an editor.
You might want to keep a weather eye on folder sizes and free space on your drive before you choose which of your visuals to transfer though – most of the astro folders for sessions during my review ended up being more than a gigabyte in size, some were much larger.
Regular photos (for daytime snaps, bursts, time-lapses etc) are stored as JPEG files. The Dwarf III also saves the individual stacked captures for each astro session as FITS files (TIFF format can be selected), for importing into an editor and going bananas to produce your own stacked astrophotos instead of the ones that the system produces. A combined PNG-format stack image is also saved to each session folder.
Combining FITS files in stacking software and then tweaking parameters can also be a lengthy process, but the time spent will generally yield better results than the default output, plus you can remove unworthy or problematic files from the stack. And it's not really cheating to tweak images in this context, even the publicly shared astro images from NASA's telescopes are manipulated for visual appeal or clarity.


A few other things of note
The first smartphone to connect to the Dwarf III will be classed as the host device, but friends and family can also run the app as device nodes – which means that the host controls functionality but the nodes can share the viewing experience on their own handsets. At the moment, up to three devices can be used in this way simultaneously.
The Dwarf III comes with a capacious 10,000-mAh battery for around 6 hours of usage per charge, depending on how the unit is being used (4K tracking video, for example, will reduce up time to around 3 hours). This may seem generous, but if you set your Dwarf up for an overnight astro shoot, the battery might die before the end of the session so you'll need to keep this in mind when scheduling your celestial grabs. That said, you could plug an external powerbank into the USB-C port to extend the up time.
On scheduling – since waiting around for a session to complete and the visuals to then be added to the album can be a lengthy process, and a boring one, it's possible to set up the Dwarf in the yard or open space and schedule the capture to start later. This way the device can gather its stacks while you're safely tucked up in bed.
And you needn't necessarily worry about leaving the unit outside during a downpour, it might potentially spoil your capture session, but the unit has been designed resistant to dust, moisture and dew to IP54 standards. It's also reported capable of operating in temperatures running from 0 °C and 45 °C (32 - 113 °F), though it regularly dipped below the minimum during my nocturnal activities and the Dwarf didn't seem to grumble. The lenses didn't even fog up!
The bottom of the main body has small vents that house a speaker and a microphone – the former allows for status noises and the like to sound but the company told us that the microphone hasn't yet been enabled. A future update may allow nifty voice control though there's no word on whether the ability to add audio to video footage is also in the pipe (currently it's not possible to record sounds with videos).
The bottom line
Many of the reviews online seem to be from astrophotography veterans, this one isn't. I'm new to the dark art, but the Dwarf III smart telescope is designed to be fairly straightforward for beginners, with enough advanced features available to satisfy more experienced stargazers too.
Did my experience prove to be as simple as power on, connect, tap the app, choose a target and wait? For fairly simple photography during the day or capturing quick Sun/Moon shots, yes. But there were a number of vital steps in between those basic actions for astro stacks that proved either fiddly or time consuming, or both.
Though the session results straight out of the box were pretty decent, users will benefit from specialist software to process the goods. The drawbacks here are extra expense and adding even more time to your astro clock before you're able to enjoy and share any deep sky imagery. That said, I managed to make some notable improvements using a free app (GIMP).
DwarfLab has certainly made astrophotography a whole lot easier than trying to navigate the complexities of a prosumer rig. Sure, imagery captured by the smart telescope isn't going to match the output of more advanced (and much more expensive) equipment, but when you consider the asking price of US$499, it does an exceptional job.
As an introduction to astrophotography, I'd say the Dwarf III works very well – particularly as it's about the same price as a mid-range smartphone. But as with most things, the more you learn, the better your experience will be.
Product page: Dwarf III