Ample storage space and extreme searchability are two of the driving factors behind Gmail's popularity. However, it's easy to abuse those luxuries and find yourself buried in an inbox thousands of messages deep. Here are New Atlas' tips for achieving an immaculate inbox so you can find what you need, when you need it.
Get label savvy
If you're not using labels in Gmail, it's time to start. Labels can act as folders – places to store messages instead of the inbox – or they can act just like regular labels, identifying tags that appear next to the subject line of your messages to help keep you organized.
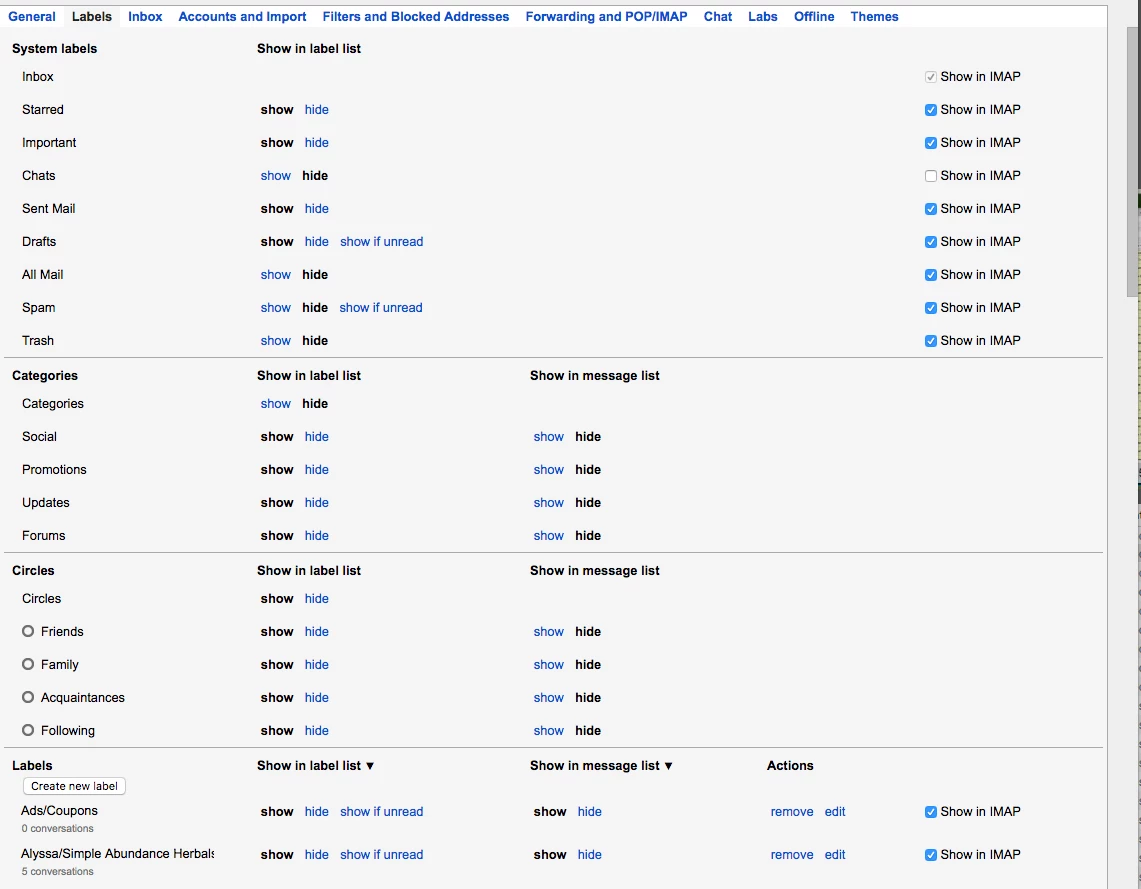
To create a label, you can either go to Settings > Labels > Create New Label, or when you have an email open, you can click the "Move to" or "Label" icons, then hit "Create New". When you Move an email, you are filing it away into a folder. When you Label an e-mail, you are simply adding an identifying tag.
It's possible to apply more than one label at a time, as well as create sub-labels. For example, you could have a main label called "Clients" and a sub-label for each individual.
You can also color-code labels for more at-a-glance visual organization. After you create a label, find it in the left hand column, and hover over the heading. Click the downward-facing arrow to the right of the title, and you'll see the "Label Color" option.
To further define, edit or delete labels, head to Settings > Labels. You can configure (but not delete) system labels like Starred, Important, Sent Mail and Drafts, or you dial in the ones you've created yourself.
Use filters to delete similar emails – and decide what to do with them in the future
Gmail's filtering capabilities are tremendous time savers when culling an unruly inbox. Filters let you group e-mails by sender, recipient, subject and more, so you can deal with messages en masse.
Once the your messages are filtered, you can either delete them all at once, or you can take it a step further and instruct Gmail what to do with similar incoming messages in the future.
To get started, open your Gmail inbox and open one of your problematic messages – perhaps a newsletter, reminder, or alert. In your browser, locate the "More" button above the message. Click the button to see the submenu. Select "Filter messages like these."
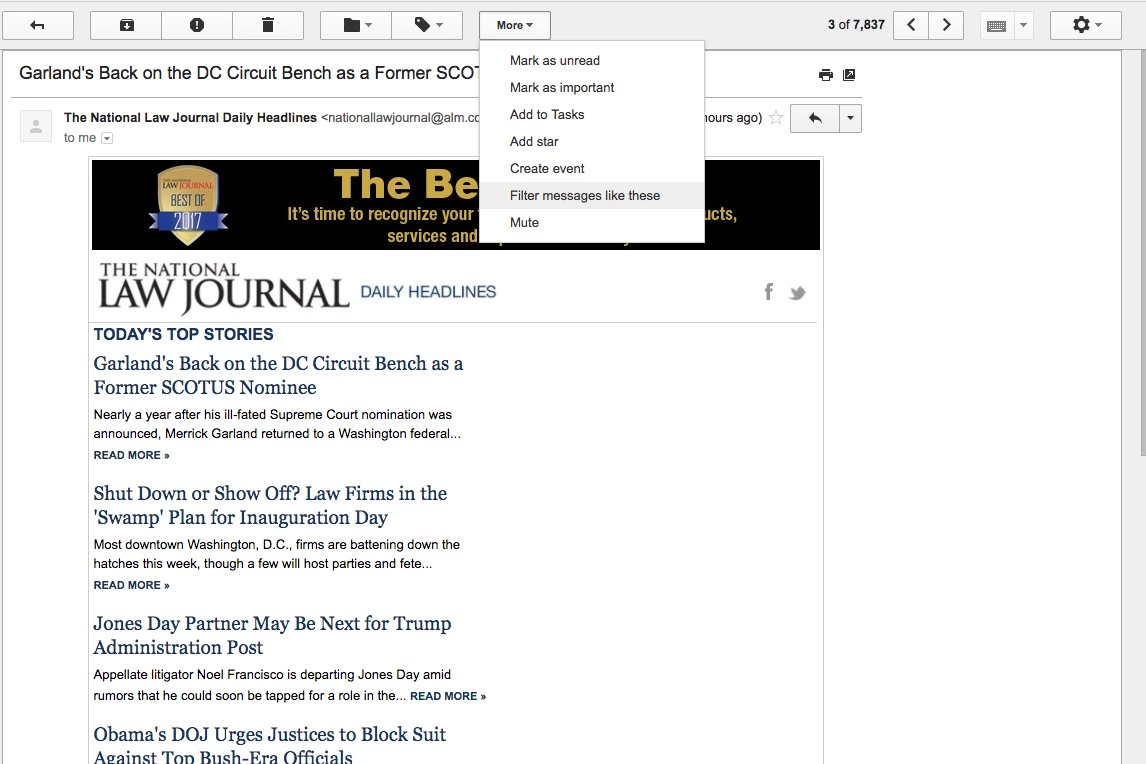
You'll be greeted with a Filter window with several options. It's usually autofilled with the sender as the common thread (which should be enough for many types of spammy content) but as you see, it's possible to further refine the group.
Once you've set your parameters, you have two options. You can either click the blue search button on the left, or the "Create filter with this search" link on the right.
Delete filtered items
If you just want to round up and delete these filtered messages, click the blue search button. You'll be greeted with a filtered inbox, which shows all of the emails that fit your criteria. You might see hundreds or even thousands of emails.
Look them over to make sure there's nothing of consequence, then go for the gold. Tick the square box at the very top of the page (inline with the menu bar), which selects all messages on the page. Now go ahead and click delete. Bye, depressing confirmations of takeout ordered online!
In some cases, more messages may fit the filter than are displayed on one page. In that case, checking the "select all" box only selects the messages on the first page. Once you check it, though, Google will issue an indication in the top bar of your inbox: "All X conversations on this page are selected. Select all X conversations in X."
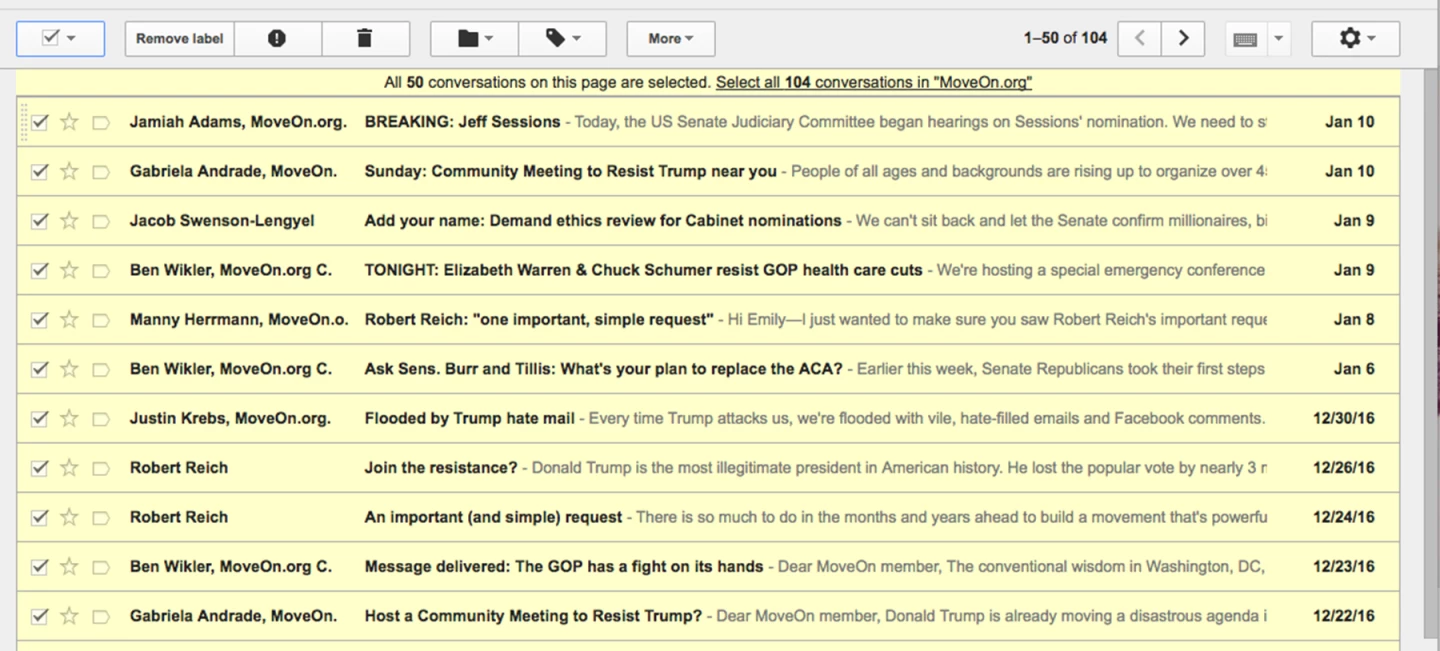
If you know for certain that this filter contains pages and pages of junk, save yourself a few clicks and select the "Select all X conversations" option." Then, you'll only have to hit delete once. Large batches of emails may take a few moments to disappear.
Create a filter with instructions
To be proactive about maintaining your inbox, don't just purge. Set instructions for how these types of emails should be handled in the future.
From the filter window, instead of clicking the blue search button, hit "Create filter with this search." The next window lets you choose what happens when a message arrives that matches this filter.
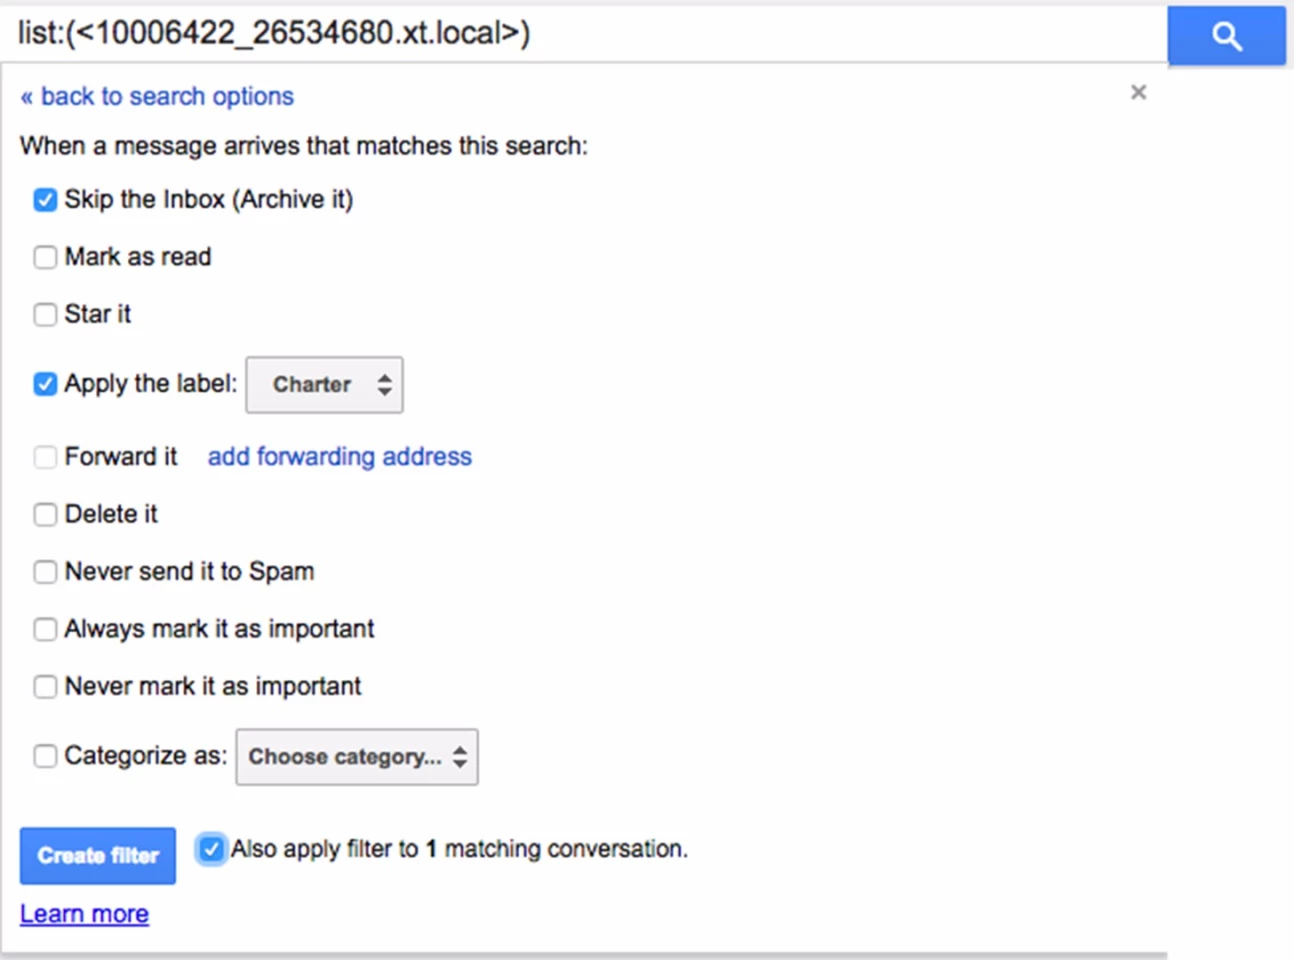
In my example, I want these messages (billing statements from my ISP) to skip the inbox entirely, and instead be sent directly to a labeled folder (Charter). I have the "Also apply filter to matching conversation" box checked – that way, the results of the search I just conducted will also be filtered according to these instructions.
Now, whenever I want to see these statements, I can just click the "Charter" folder in the left column of my Gmail inbox. This makes it easy to select these unimportant messages and delete them later on, and serves as a handy archive of info I may need to refer back to.
This is just an example of a filter configuration, but you will find other settings work best for different needs. For example, you may be dealing with stubborn promotional offers that won't go away with the Unsubscribe feature. In that case, you probably want to check off the "Delete it" option.
Conversely, you can also use filters to make sure your important emails get prioritized. You can always mark certain messages as important, make sure they never go to Spam, or star them (a neat trick for weeding out promotional emails is to create a filter for emails that have the word "unsubscribe" in it).
Viewing and editing filters
To alter or delete a filter you've already made, navigate to Settings > Filters and Blocked Addresses. This is helpful if your filters end up too aggressive – or not aggressive enough.
Search, another way to delete in droves
Perhaps there's a certain subset of messages that you want to delete, but filter options don't encompass them. You can search for a phrase in the search bar, or you can click the downward facing arrow in the search bar for more options.
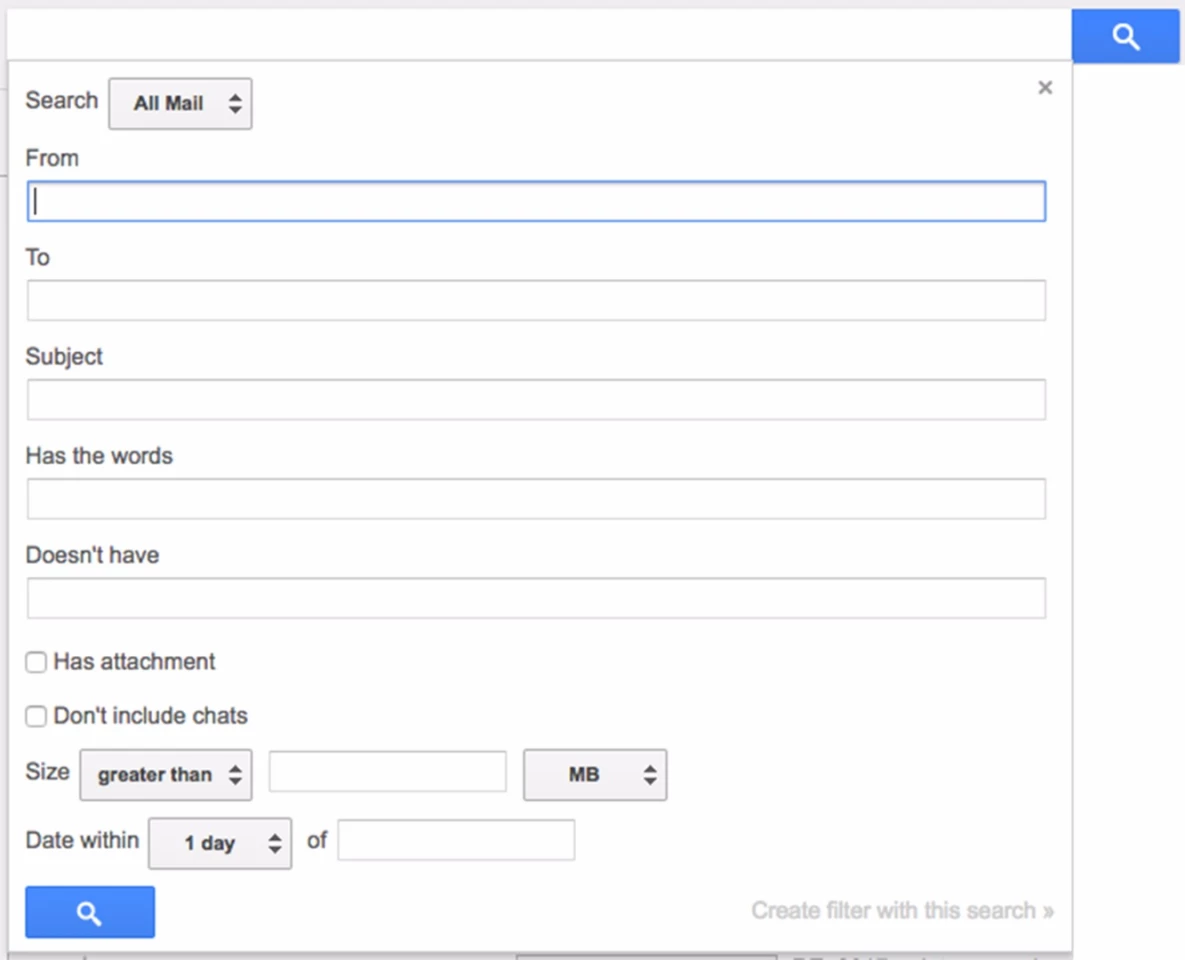
If you're running low on Google Drive storage space, one suggestion is to search for large file sizes, so deleting efforts go as far as possible. Over 20 MB is a good starting point.
Unsubscribe, Block, Mute and Archive
Promotions and newsletters are often image-heavy, so they take up a lot of storage space. If you're anything like me, you get them plenty and often, and you don't want to have to scroll through to find the unsubscribe link hidden at the bottom of the message body.
Good guy Google has your back. If you haven't noticed, there's an Unsubscribe option at the top of every message that Gmail determines is some kind of mailing list. In some cases, you'll be forwarded to the sender's unsubscribe page, but often, you can just confirm your choice without leaving your inbox.

Every once in awhile, the unsubscribe feature falls short or does not apply. If a sender won't cease aggravating you, you can block them. To do so, open the offending email and click the downward facing arrow next to the reply button. You'll see a "Block" option about halfway down. When you block someone, their emails skip the inbox and head straight into the Trash folder, where messages are permanently deleted after 30 days. The sender doesn't know they've been blocked, and you can still email them normally.
There is also a mute option, which archives an email (and any ensuing replies to the thread) instead of deleting it or sending it to one of the folders you've created.
The Archive function is easy to overlook or misunderstand, so let's explain it. On the left side of your Google inbox, below any folders you've created, you'll see an "All Mail" option – that's where archived and muted messages go.
"All Mail' is basically a no-man's-land between your inbox, the trash can, and any folders/labels you create. Messages in "All Mail" can be searched and replied to just like normal mail, but they won't clog up your clean inbox. It's like the couch where you keep the clothes you've worn once, because they're too clean for the hamper but too dirty to hang next to your fresh laundered duds.
Hyper-organized types might eschew such a space altogether, or use it only selectively. But for a less idealistic e-mail sorter like me, archiving is an alluring option for getting an overly full inbox down to zero and steadily reigning in a messy email situation.
Faced with an inbox containing over 3,000 unread emails – plus several thousand pieces of read, unsorted mail – archiving was my final step in achieving a zero-count inbox. In my recent bout of Gmail organization, my steps looked something like this:
- Unsubscribe from as many lists as I could easily find
- Delete old promotional e-mails, newsletters and social notifications using filters
- Use filters to move old items to appropriate folders and set future actions
- Search for overly large emails that take up too much space; delete them
- Archive everything else.
Keep it clean moving forward
Once you get your inbox down to a pleasant level, there are a few tools and strategies that may be helpful in keeping in that way.
Customizable category tabs
In 2013, Gmail introduced Category Tabs, a method of dividing up your inbox into types of messages. The default tabs are Primary, Social and Promotions, and for the most part, Google does an excellent job of automatically sorting messages into these categories.
You may not know that these tabs are customizable. Excepting the primary tab, you can add or remove categories. Go to your inbox settings (Gear icon in top right corner > Settings > Inbox) and check/uncheck the boxes as needed. You'll see that there are a couple of additional options: The Updates tab corrals auto-generated updates like confirmations, bills and statements. The Forums tab will come in handy if you're a member of groups, discussions and mailing lists that regularly flood your inbox.
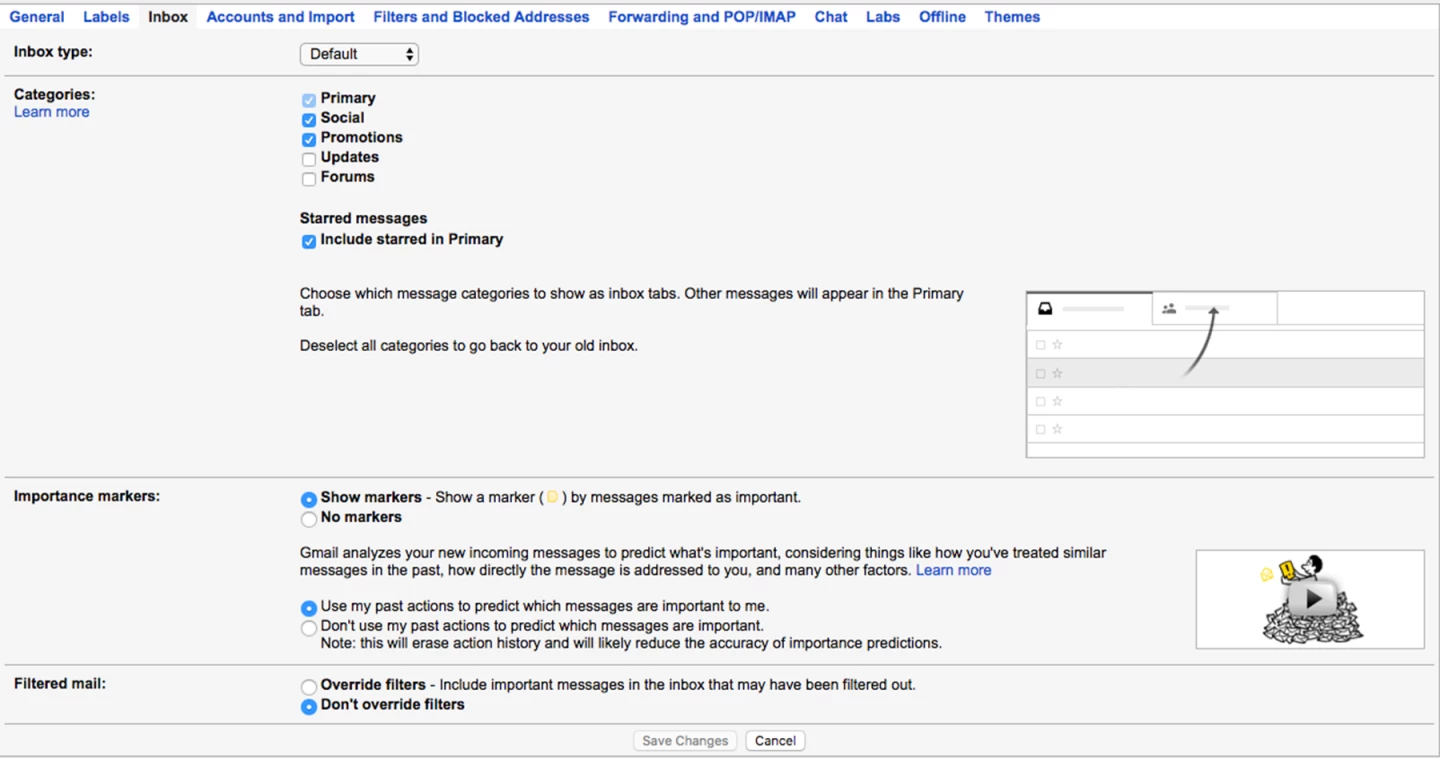
There is also a "Categorize as" option on the filters menu, so you can sort something that's slipping through the cracks.
iPhone users, get the Gmail app
If you have an iPhone and you're using Apple's Mail app, you're missing out on Gmail's powerful inbox features. Switch to Gmail for iOS or Inbox by Gmail, and you'll be able to stay more organized on the go. You don't need to worry about having redundant apps, either. Since iOS 10 was released, iPhone and iPad users can finally delete stock apps like Mail (though doing so only hides them, rather than freeing up storage space on your device).
Those moments where you find yourself idly playing on your phone – during a commute, waiting in line, etc. – are a great opportunity to keep in your inbox in check.
Try out third-party apps
Some third-party apps may streamline the Gmail inbox experience even further. For example, If your Gmail gets unruly because you use it like a to-do list (marking Unread when you need to return to it, for example), try Todoist. The free app helps takes Google's Tasks feature a step further and helps automate the process of creating a list based on your inbox.
Unroll.me is a free unsubscribing service that should save time over the manual option. It gathers all of the newsletters you're subscribed to and puts them in one place for your review.
SaneBox is a paid service that tackles the archiving/muting issue automatically. It learns and detects which emails are unimportant to you and intercepts them to "@SaneLater" folder, skipping the inbox. If you have more than 5,000 emails in your inbox when you sign up, SaneBox archives the ones that are more than a year old.
For more Gmail know-how, check out these tips and tricks for getting the most out of Gmail.


