3D Printing

New tool makes 3D-printed objects look less 3D-printed

New tool makes 3D-printed objects look less 3D-printed
Comparison of printed surface before smoothing (1), with smoothing by conventional methods (2) and by 3D-CMF (3)
View 1 Image
Comparison of printed surface before smoothing (1), with smoothing by conventional methods (2) and by 3D-CMF (3)
1/1
Comparison of printed surface before smoothing (1), with smoothing by conventional methods (2) and by 3D-CMF (3)

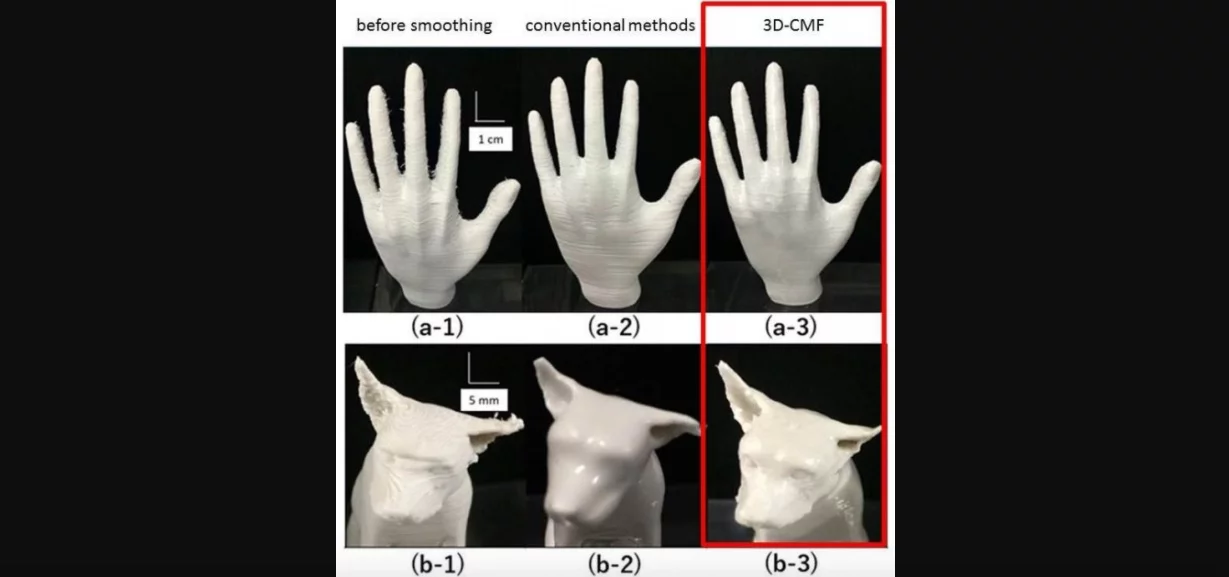
Although consumer 3D printers can do some pretty amazing things, the objects that they create do tend to have kind of a low-resolution look to them. This is because of an issue known as surface ribbing, in which there are grooves visible between the deposited layers of material. While there are methods of smoothing down the ridges on either side of those grooves, scientists from Japan's Waseda University have developed a technique that they say is superior. It's intended for use on objects made of resin.

One of the existing methods of addressing surface ribbing involves grinding the ridges down, while another method involves exposing the object to a mist of vaporized solvent that melts the ridges so that they fill in the grooves.

The former wastes resin, however, and it generates dust which must be dealt with. The latter, on the other hand, involves dealing with large amounts of potentially hazardous solvent, plus it indiscriminately treats the surface of the entire object, sometimes melting away desired details. Whichever method is used, the scientists say, it involves adding complexity – and thus a higher price – to the 3D printing process.

Led by Kensuke Takagishi and Prof. Shinjiro Umezu, the Waseda team created a technique known as 3D Chemical Melting Finishing (3D-CMF).

It involves using a felt-pen-like tool to manually apply solvent only in the areas where it's needed, and in carefully controlled quantities. Additionally, different sizes and shapes of tips can be used on the tool, to more accurately control the application of solvent.

As a result, ridges are smoothed down and grooves are filled in as needed, there's no dust or wasted resin, plus less solvent is required and fine details don't get lost. What's more, the tool itself should be relatively inexpensive if produced commercially.

A paper on the research was recently published in the journal Scientific Reports.

Source: Waseda University

3 comments
3 comments
MQ
wahoo..
well.. what about the commonly used resins which may be somewhat restsitant to solvent remodelling once cured (and you don't really want to mess up an uncured SLA or DLP model.
For FFD modelling with ABS, artists have been retouching models with solvent and paintbrushes for a long time. However, controlled solvent droplet deposition (TM) does a fine job of only remodeling the surface features at the detail level of the layer ribbing. Printed detail must actually be an order of magnitude (or larger) greater than the layer thickness in order to be well defined anyhow, so no, fine details do not get eroded by "correct" solvent smoothing methods...
Sometimes sanding, blasting and grinding etc will be necessary for the desired surface finish, tolerance and texture, just as for "practically all other" manufacturing methods (except single shot untreated injection moulding or die casting - and even with these methods followup treatments are usually necessary).
VirtualGathis
I'm not sure it would fit into the "consumer" category, but the Carbon doesn't produce the ridges, so needs none of this post processing. Ref: http://www.carbon3d.com/ Specifically: http://www.carbon3d.com/clip-process
The B9 also does a decent job of not producing the ridging. Its price point is more consumer friendly. Ref: https://www.b9c.com/
So I guess it really depends on how much one is willing to invest on how inevitable the ridging issue and attendant post processing are.
Ralf Biernacki
Underwhelming. The "new method" requires skilled manual retouching of the model. Yes, it gives better results than just dunking the piece in solvent---duh. But the whole point of 3D-printing is to replace skilled craftsmanship with automation. Puttering away with dremels and/or solver applicators just sort of defeats the point. <p> And, BTW, the dog head in the middle photo is simply excessively eroded, presumably deliberately---to provide more favorable contrast to the manual method. With a shorter treatment time there would be much less of a difference.