Bicycles

Review: Blinkers combines almost every type of bike light in one snazzy package

Review: Blinkers combines almost every type of bike light in one snazzy package
The Blinkers headlight, in Emergency mode
View 9 Images
The Blinkers headlight, in Emergency mode
1/9
The Blinkers headlight, in Emergency mode
The Blinkers bar-mounted RF remote
2/9
The Blinkers bar-mounted RF remote
The Blinkers lights quickly and easily pop in and out of magnetized brackets mounted on the handlebars and saddle rails
3/9
The Blinkers lights quickly and easily pop in and out of magnetized brackets mounted on the handlebars and saddle rails
One 2.5-hour USB charge of each Blinkers light's lithium-ion battery should be good for about two weeks of use, based on two hours of riding per day
4/9
One 2.5-hour USB charge of each Blinkers light's lithium-ion battery should be good for about two weeks of use, based on two hours of riding per day
The Blinkers tail light's laser projects a sort of "safety zone" onto the road behind the bike
5/9
The Blinkers tail light's laser projects a sort of "safety zone" onto the road behind the bike
The Blinkers headlight puts out 100 lumens
6/9
The Blinkers headlight puts out 100 lumens
The Blinkers tail light puts out 30 lumens, or 100 when the brakes are applied
7/9
The Blinkers tail light puts out 30 lumens, or 100 when the brakes are applied
The beam pattern of the Blinkers headlight
8/9
The beam pattern of the Blinkers headlight
The major components of the Blinkers system
9/9
The major components of the Blinkers system
View gallery - 9 images

A couple of years ago, Swiss company Velohub took to Kickstarter to finance production of its Blinkers bicycle lighting system. This March, the product became available for regular purchase, and we recently got to try it out for ourselves. Our verdict? It's everything you could possibly want in a bike light.

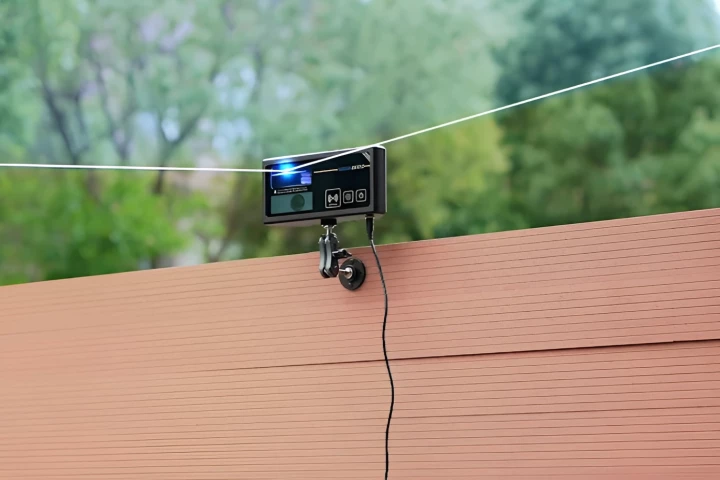
Blinkers consists mainly of a water-resistant head- and tail light, which quickly and easily pop in and out of magnetized brackets mounted on the handlebars and saddle rails. There's also a bar-mounted RF (radio frequency) remote, which is used to wirelessly control the lights. We found that attaching everything to the bike was straight-ahead and simple, although care needs to be taken not to over-tighten – we broke the headlight bracket when attempting to put it back on for some extra photos.

Upon initially installing the system, the remote needs to be paired to the lights. Once we discovered that this works best by starting with the remote between the two, as opposed to starting at the back and then going forward, this proved to be easy.

The Blinkers lights quickly and easily pop in and out of magnetized brackets mounted on the handlebars and saddle rails
The Blinkers lights quickly and easily pop in and out of magnetized brackets mounted on the handlebars and saddle rails

From there, every time you go out for a ride, it's just a matter of plugging each of the 180-gram lights into their brackets, which automatically powers them up. Depending on which of the remote's four buttons you press, and for how long, you can then do the following things:

  • Set either/both lights to steady output (headlight: 100 lumens, tail light: 30 lumens)
  • Set them to bright or low-output flashing modes
  • Activate their turn indicators, in which a strip of amber LEDs on either side flash sequentially
  • Set them to Emergency mode, in which all of the turn-indicator LEDs flash at once, like the four-way flashers on a car
  • Activate the tail light's laser, which projects a sort of "safety zone" onto the road behind the bike (see photo below)
  • Additionally, regardless of what function is selected, an accelerometer in the tail light will cause it to temporarily brighten to 100 lumens, whenever the brakes are applied
The Blinkers tail light's laser projects a sort of "safety zone" onto the road behind the bike
The Blinkers tail light's laser projects a sort of "safety zone" onto the road behind the bike

One 2.5-hour USB charge of each light's lithium-ion battery should be good for about two weeks of use, based on two hours of riding per day. The only thing to add here is that there's no way of checking the progress of that charging, or seeing when it's complete, other than to unplug the USB cable and then plug it back in again. The LED strips do display the current charge level, however, whenever you plug the lights into their mounts.

The remote's replaceable coin cell battery should be good for about 10 months.

On the road, the Blinkers setup was solid, rattle-free and easy to operate. The turn indicators can be switched off manually after each turn is made, or they can be set to shut off automatically within 12 seconds of being activated. We found it preferable to turn them off ourselves, as 12 seconds either left them on for too long after the turn, or wasn't long enough if waiting for a traffic light to change.

The beam pattern of the Blinkers headlight

The rear laser is a 30-euro optional extra, and if we were buying the system for ourselves, we probably wouldn't bother with it. Not only does it use up the battery, but we're also not sure how much attention motorists would actually pay to it.

Minor quibbles aside, though, we really liked Blinkers. It's a well-constructed, sleek and user-friendly way of combining just about every type of bike light you'd ever have use for. Although cheaper packages are available (such as the one without the laser), the full system we tried sells for €199, or about US$237.

Product page: Blinkers

View gallery - 9 images
4 comments
4 comments
DaveWesely
This is not everything you would want in a bike light. First problem: It is easily removable and stolen if left on the bike. Why do vendors think we want to take parts off of our bikes when we park them? Permanently attach them like a brake or derailleur and they won't be stolen. Second problem: It broke when attached to the bike. Sounds cheaply made for a $200 accessory. Third problem: Turn signal lights are not far enough apart. They should be at the ends of the handlebar, not in the middle. It wouldn't add more parts - putting them on the ends of the handlebars would eliminate the need for duplicate blinkers on the seat post. In fact, everything could be put on the ends of the handlebars (headlights, taillights and turn signals). Fourth problem: Why a remote? Where are you going to put it while you ride? Not only will you forget the lights when you go for a ride, you have a remote to lose as well.
Nik
''......the full system we tried sells for €199, or about US$237.'' I can buy a bicycle for less than that!
Trylon
DaveWesely, I want to take lights off my bike because any and every part of a bike can be stolen, even brakes and derailleurs. Those of us who have been bicycling for a while know we have to remove things like cyclecomputers (there are no permanently mounted ones). With the magnetic mounts on this, it takes only a second to pull it off or put it back on. It's also a lot easier to charge if I don't have to drag my bike into my home or office and park it in front of an outlet. What NewAtlas broke was the plastic mounting bracket when they removed it from the handlebars then overtightened while reinstalling. Anything can break if mechanics are ham-handed. Even steel screws can break, which is why machine shops and auto service shops always keep screw extractors on hand. Your handlebar end suggestion neglects the fact that the rider's body can block the view of the right end of the handlebar from cars coming up from behind. A central light is unobstructed. The turn signals actually have a traveling pattern, moving outward from the central brake light, which gives a better idea of which turn is being indicated. They're not simple on-off flashers. The remote straps to the handlebars. Why would somebody want to steal it if you accidentally leave it on the bike? It's useless without the lights. One thing that's not said in the article is that the laser is designed to automatically shut off after 10 minutes to avoid burning out, making it useful only for very short rides. I wouldn't pay the extra charge for it.
Adam 12
A warning about Velohub. They do not stand behind their product. An early batch had a design defect that left the laser dimly on when the light is turned off, draining the battery. They admit there was a problem and say it's been fixed in later production runs, but if you want yours exchanged and you live in the US, you'll have to pay $25 postage out of pocket to send it back to Zurich. Velohub will not reimburse you for that even though the flaw was their fault. So if you expected to pay $150 for a properly functioning light and Velohub makes another design error, you will end up paying $175 for it instead, if not more.